how to plan a freestanding patio cover in the U.S. Understand permits, footing depth, posts, beams, rafters, bracing, wind uplift, snow load, roof pitch, drainage, and design options.
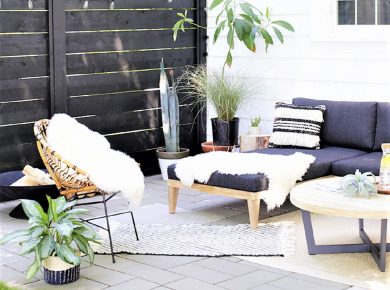
A freestanding patio cover can make an outdoor space more useful, comfortable, and attractive. It can add shade, reduce heat, protect outdoor furniture, and create a better place for dining, relaxing, or entertaining.
However, a freestanding patio cover is not just a decorative backyard feature. It is a structure with a roof, posts, beams, fasteners, anchors, and footings. It must resist gravity loads, wind uplift, lateral movement, and in some regions, snow or seismic forces. If it is built incorrectly, it can lean, rack, lift, leak, rot, or fail during a storm.
In the United States, many freestanding patio covers require a building permit. Local rules vary by city, county, state, climate zone, wind speed, snow load, frost depth, wildfire risk, flood exposure, and HOA rules. Before building, homeowners should confirm local requirements and avoid using one-size-fits-all instructions.
This guide explains what a freestanding patio cover is, how to plan it safely, what components matter, what mistakes to avoid, and when to call a licensed contractor or structural engineer.
Important Safety Note
This article is a planning guide. It is not a complete construction plan.
Do not build a freestanding patio cover based only on a blog article. Final design must follow local building code, permit requirements, soil conditions, frost depth, design wind speed, snow load, roof material requirements, and manufacturer instructions.
If your patio cover is large, tall, roofed, located in a high-wind area, located in a snow region, or built near a property line, consult your local building department, a licensed contractor, or a structural engineer before construction.
What Is a Freestanding Patio Cover?
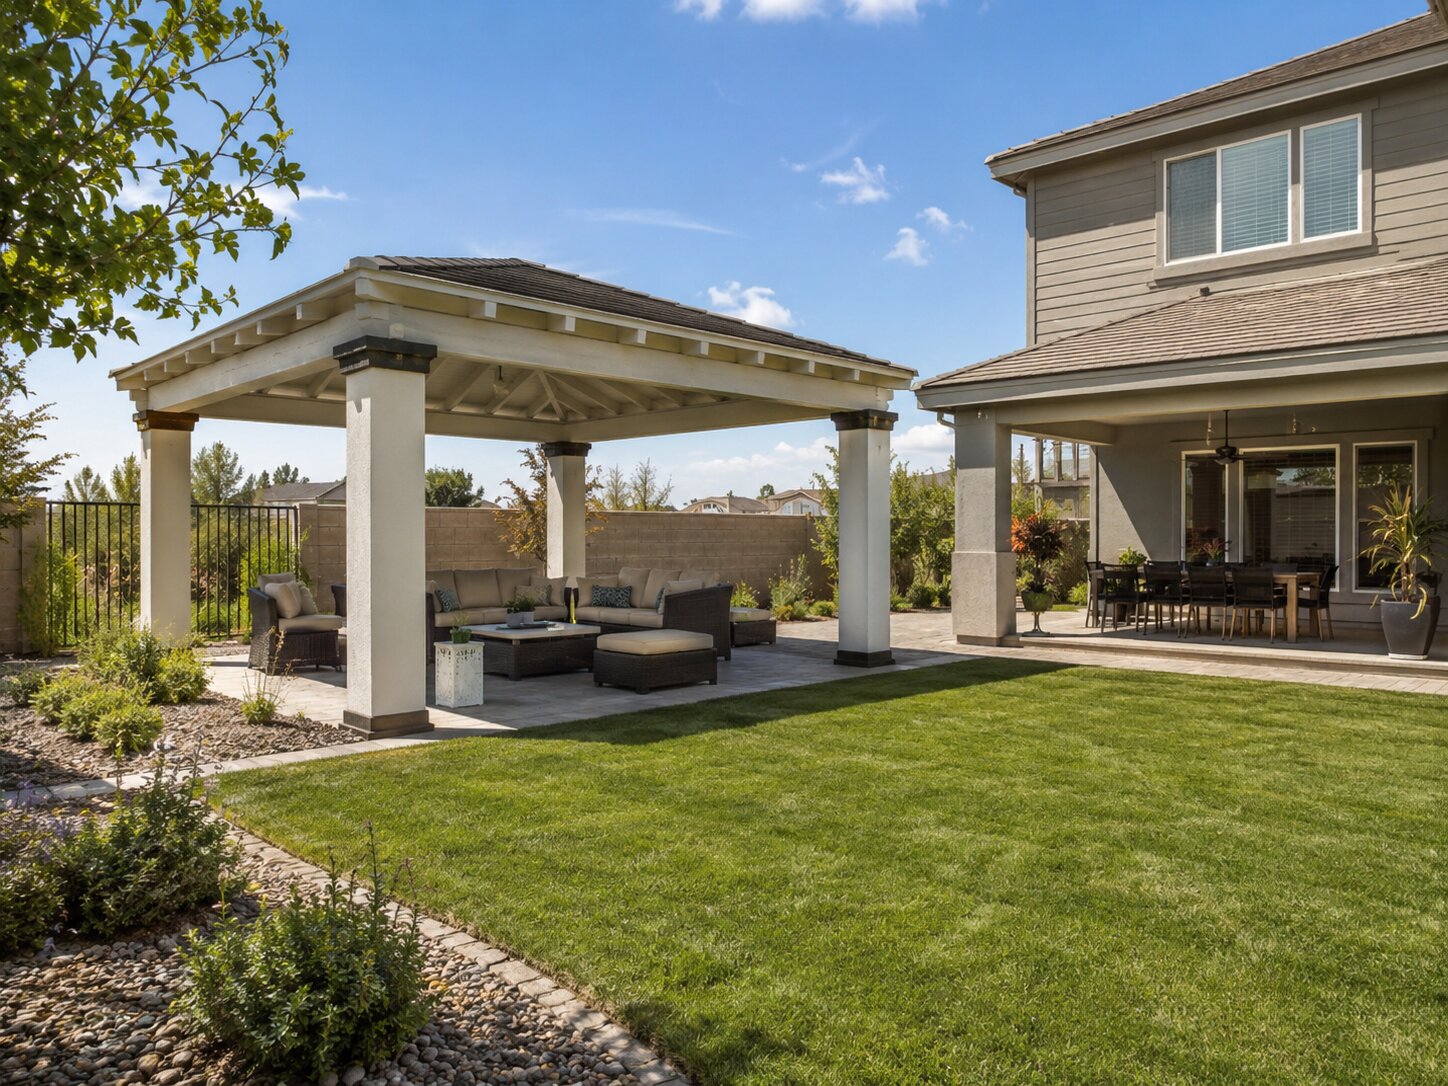
A freestanding patio cover is an independent roof or shade structure built over a patio or outdoor living area. It is supported by its own posts, beams, footings, and structural connections. It does not rely on the house wall, fascia, roof, or framing for support.
A freestanding patio cover may be built over:
- A backyard patio
- A poolside seating area
- An outdoor kitchen
- A garden seating area
- A detached lounge space
- A fire pit area
- A dining terrace
- A concrete slab or paver patio, if the structure has proper footings
The key point is independence. A freestanding patio cover carries its own loads down to its own support system.
Freestanding Patio Cover vs. Patio vs. Pergola
These terms are often mixed together, but they do not mean the same thing.
A patio is the outdoor floor or surface. It may be made from concrete, pavers, stone, tile, gravel, or brick.
A patio cover is the structure above the patio. It provides shade or weather protection.
A freestanding patio cover is a patio cover that stands independently and is not attached to the house.
A pergola is usually an open or partially open shade structure. It may not provide full rain protection unless panels or fabric are added.
A shade sail is a fabric shade system held by tensioned anchors.
A solid roof patio cover is a stronger roofed structure designed to shed rain and sometimes snow, depending on design.
Patio Cover Use Limits in U.S. Codes
In model residential code language, patio covers are intended for recreational outdoor living. They are not automatically the same as carports, garages, storage rooms, or habitable rooms.
This matters because changing the use can change the code requirements.
A patio cover used as a simple outdoor living cover may have one set of rules. A structure used for parking, storage, cooking, sleeping, enclosing walls, or conditioned living space may trigger additional rules for fire separation, ventilation, electrical work, structural loads, emergency access, or occupancy.
Before building, ask your local building department what your structure is legally classified as.
Is a Freestanding Patio Cover Safer Than an Attached Patio Roof?
A freestanding patio cover can reduce some risks because it does not require cutting into the house wall or tying into the existing roof. It may reduce the chance of roof-wall leaks compared with a poorly attached patio roof.
However, freestanding does not automatically mean safer.
A freestanding patio cover can still fail if:
- Footings are too small
- Posts are not properly anchored
- Beams are undersized
- Rafters span too far
- Roof material is too heavy
- Bracing is missing
- Fasteners are not rated
- Wind uplift is ignored
- Snow load is ignored
- Soil conditions are poor
- The structure is too tall or too wide for the framing
A freestanding patio cover is only safe when it has a proper load path, adequate footings, correct connectors, suitable materials, and code-compliant design.
Do You Need a Permit for a Freestanding Patio Cover?
In many U.S. locations, yes. A freestanding patio cover may require a permit because it is a roofed outdoor structure with posts and footings.
Permit requirements vary by location. Some areas may allow small shade structures without a permit. Others require permits for any roofed structure, especially if it has electrical work, plumbing, gas lines, outdoor kitchen equipment, large spans, high wind exposure, or snow load.
Before starting, ask your local building department:
- Does a freestanding patio cover require a permit?
- What size triggers a permit?
- Are engineered drawings required?
- What wind speed applies to my address?
- What ground snow load applies?
- What frost depth applies?
- What footing size is required?
- What setbacks apply?
- Are there height limits?
- Are inspections required?
- Can this structure be used only as a patio cover?
- Are there wildfire, flood, coastal, or seismic rules?
- Are there special rules for electrical, lighting, fans, or outdoor kitchens?
Do not rely on a generic plan from the internet without checking local rules.
HOA, Zoning, and Property Rules
A building permit is not the only approval that may matter. Your project may also need HOA approval or zoning review.
Check these items before building:
- HOA design guidelines
- Setback requirements
- Lot coverage limits
- Easements
- Utility access areas
- Height restrictions
- Fence and visibility rules
- Drainage rules
- Fire separation requirements
- Historic district restrictions
- Floodplain rules
- Wildfire zone requirements
A freestanding structure may still violate setbacks or HOA rules even if it is not attached to the house.
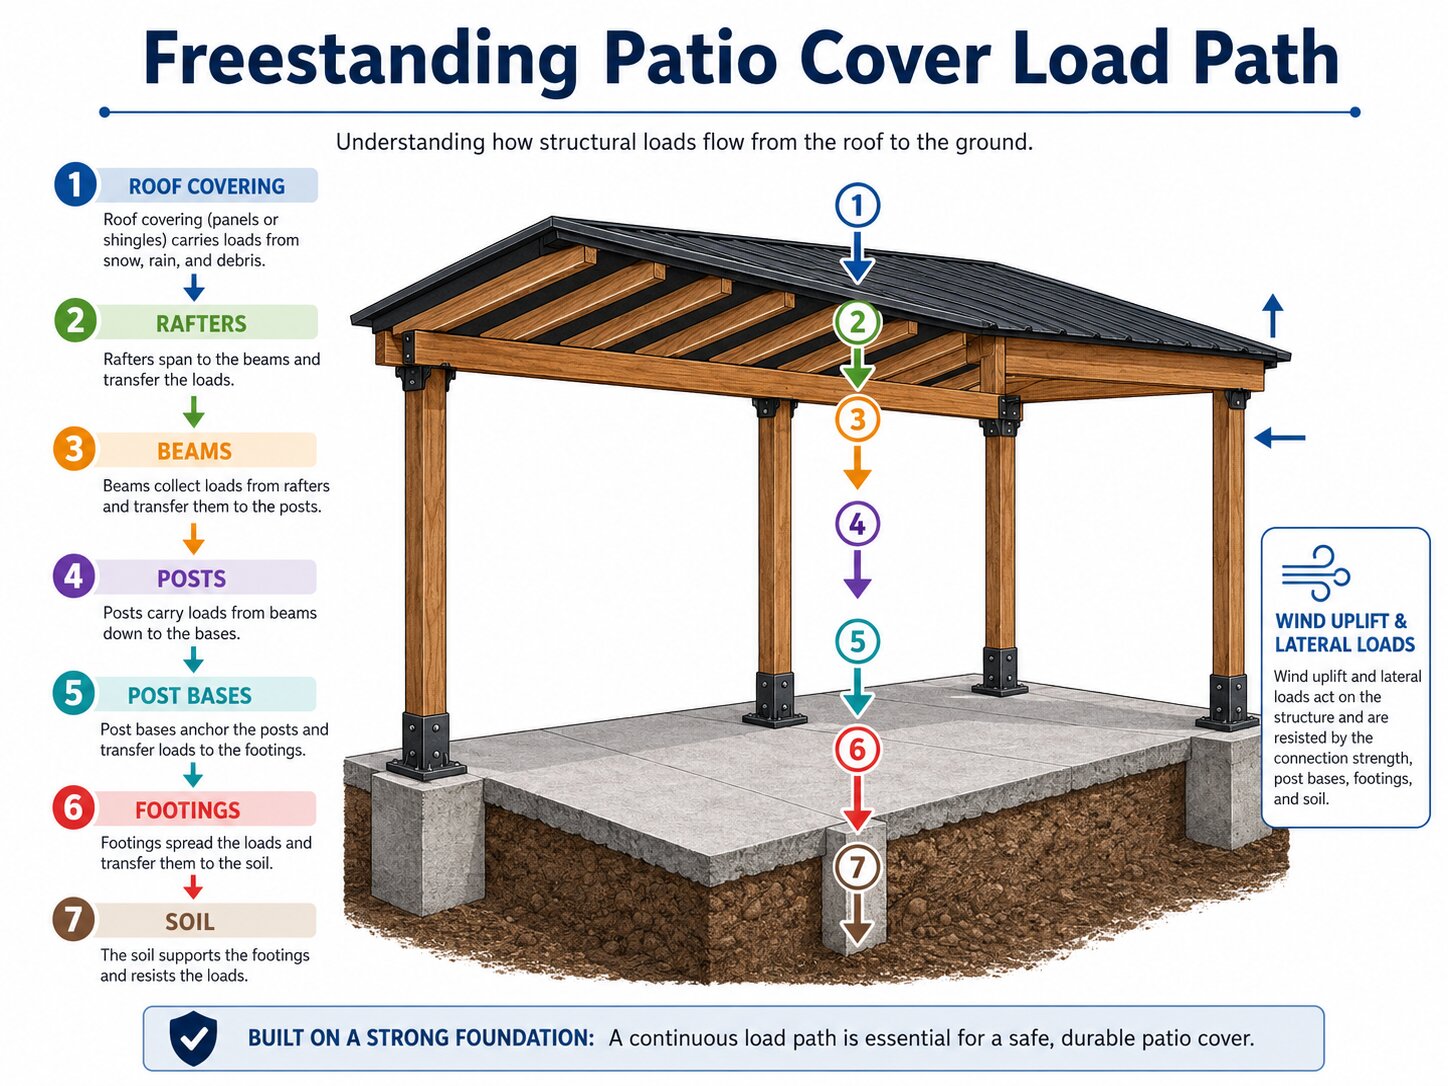
Continuous Load Path: The Most Important Structural Idea
A safe patio cover must transfer loads from the roof down to the ground.
A basic load path looks like this:
Roof covering → rafters → beams → posts → post bases → footings → soil
This path must resist downward loads and upward forces. Wind can push sideways and also lift the roof upward. Snow can add heavy downward load. A tall structure can rack or sway if lateral bracing is weak.
A strong patio cover needs:
- Roof-to-rafter connection
- Rafter-to-beam connection
- Beam-to-post connection
- Post-to-footing connection
- Footing-to-soil support
- Bracing against lateral movement
- Uplift resistance
A patio cover is not safe just because it stands on four posts. The connections between parts matter as much as the parts themselves.
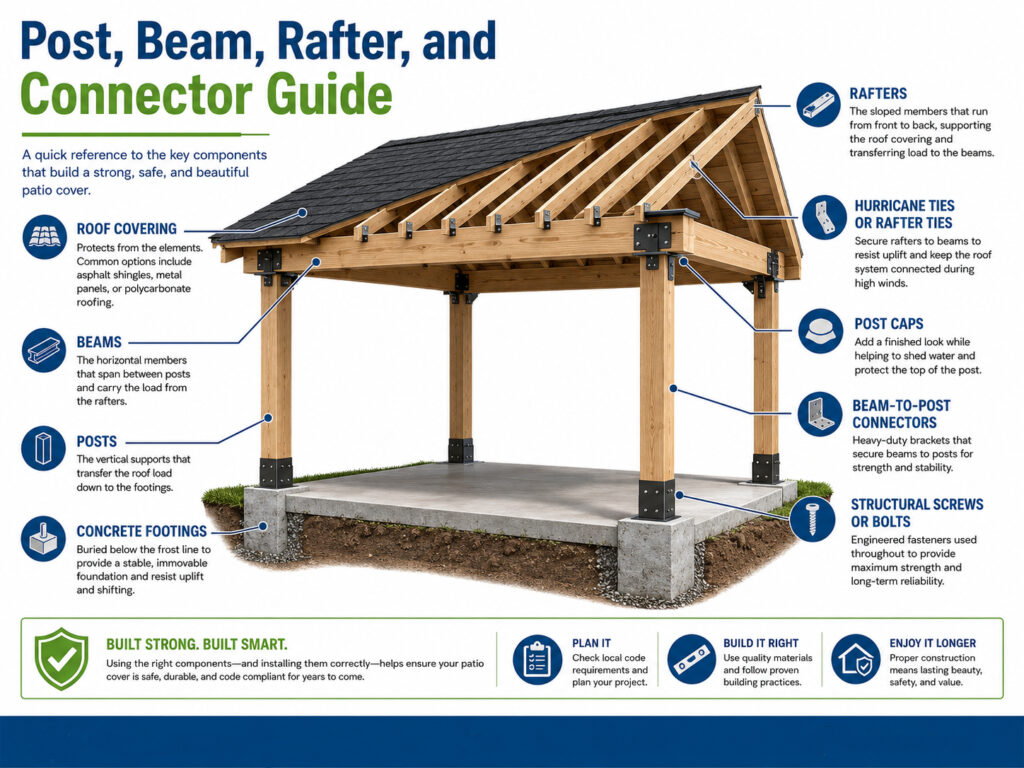
Key Structural Parts of a Freestanding Patio Cover
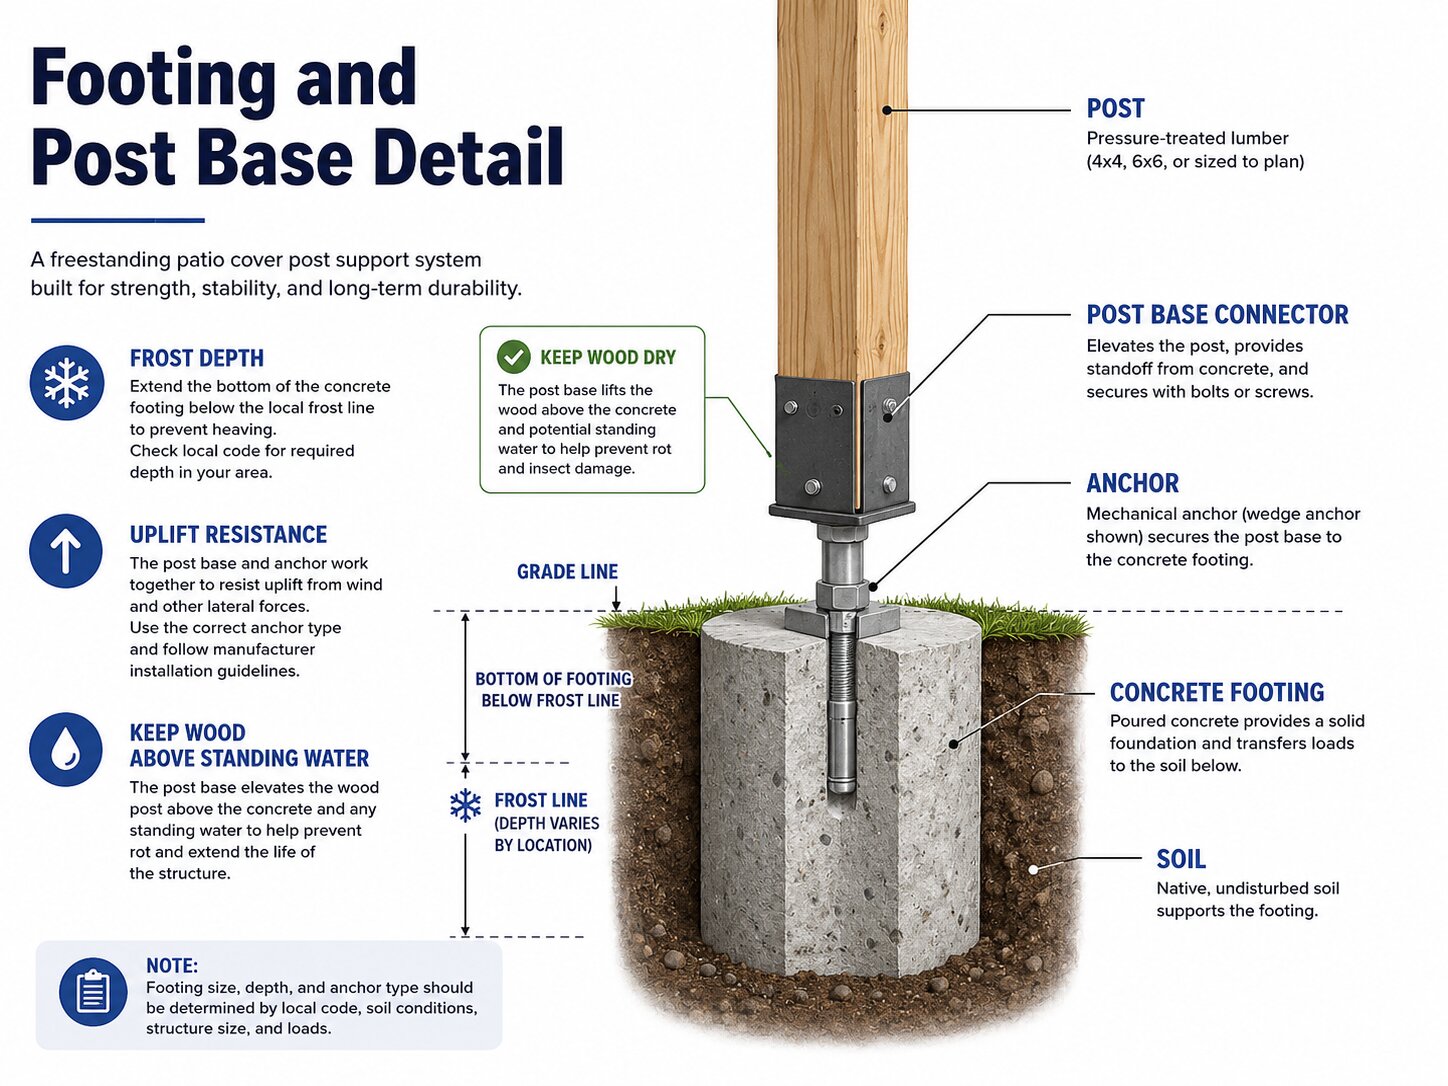
1. Footings
Footings support the structure and transfer loads into the soil. They also help resist settlement, uplift, and movement.
Footing size and depth depend on:
- Local building code
- Soil bearing capacity
- Frost depth
- Post spacing
- Roof size
- Roof material weight
- Wind uplift
- Snow load
- Structure height
- Local inspection requirements
Avoid universal instructions such as “dig 24 inches deep and 9 inches wide.” That may be too shallow, too narrow, or completely unsuitable in many U.S. locations.
In cold regions, footings may need to extend below frost depth. In high-wind areas, footing design must resist uplift. In poor soil, larger footings or engineered solutions may be needed.
2. Post Bases and Anchors
Posts should connect securely to the footing. A common approach is to use a concrete footing with a rated post base connector that keeps the post elevated above standing water.
A proper post base can help:
- Reduce moisture damage
- Improve uplift resistance
- Improve lateral stability
- Keep the post aligned
- Separate wood from direct ground contact
- Create a cleaner, more durable connection
Do not assume that placing a post directly into soil or concrete is the best method. Local code, material type, preservative treatment, drainage, and uplift resistance all matter.
3. Posts
Posts support the beams and transfer loads down to the footings. Post size must match the structure.
Common factors include:
- Post height
- Roof area
- Beam span
- Wind exposure
- Snow load
- Lateral bracing
- Material species and grade
- Whether the post supports one beam or multiple beams
Do not choose posts based only on appearance. A post that looks strong may not be adequate for the span, roof load, or wind condition.
4. Beams
Beams carry the rafters and transfer loads to the posts. Beam size depends on span, load, lumber species, grade, roof type, and spacing.
Beam design must consider:
- Distance between posts
- Roof load
- Snow load
- Rafter spacing
- Roof overhang
- Load from ceiling fans or lighting, if any
- Connection to posts
- Lateral stability
Beams should have proper bearing on posts or use approved connectors. Do not rely only on nails or short screws.
5. Rafters
Rafters support the roof covering. Their size and spacing depend on span, roof load, and roof material.
Rafter design should consider:
- Roof pitch
- Span
- Spacing
- Roof material
- Snow load
- Wind uplift
- Blocking
- Rafter-to-beam connectors
- Overhang length
A patio cover with shingles, metal panels, polycarbonate panels, or shade cloth will not have the same framing requirements.
6. Connectors and Fasteners
Outdoor structures need structural connectors and fasteners rated for their purpose. These may include:
- Post base connectors
- Post cap connectors
- Beam-to-post connectors
- Hurricane ties
- Rafter ties
- Structural screws
- Through-bolts
- Anchors
- Brackets
- Straps
- Hold-downs
Use fasteners compatible with treated lumber and outdoor exposure. Coastal environments, wet areas, and pressure-treated lumber may require corrosion-resistant hardware.
Do not substitute drywall screws, indoor screws, or unknown fasteners for structural connections.
7. Lateral Bracing
A freestanding patio cover must resist side-to-side movement. This is where bracing becomes important.
Lateral resistance may come from:
- Knee braces
- Diagonal braces
- Moment frames
- Rigid post-to-beam connections
- Proper post bases
- Roof diaphragm design
- Engineered bracing systems
Without bracing, a patio cover may sway, rack, or fail during wind events.
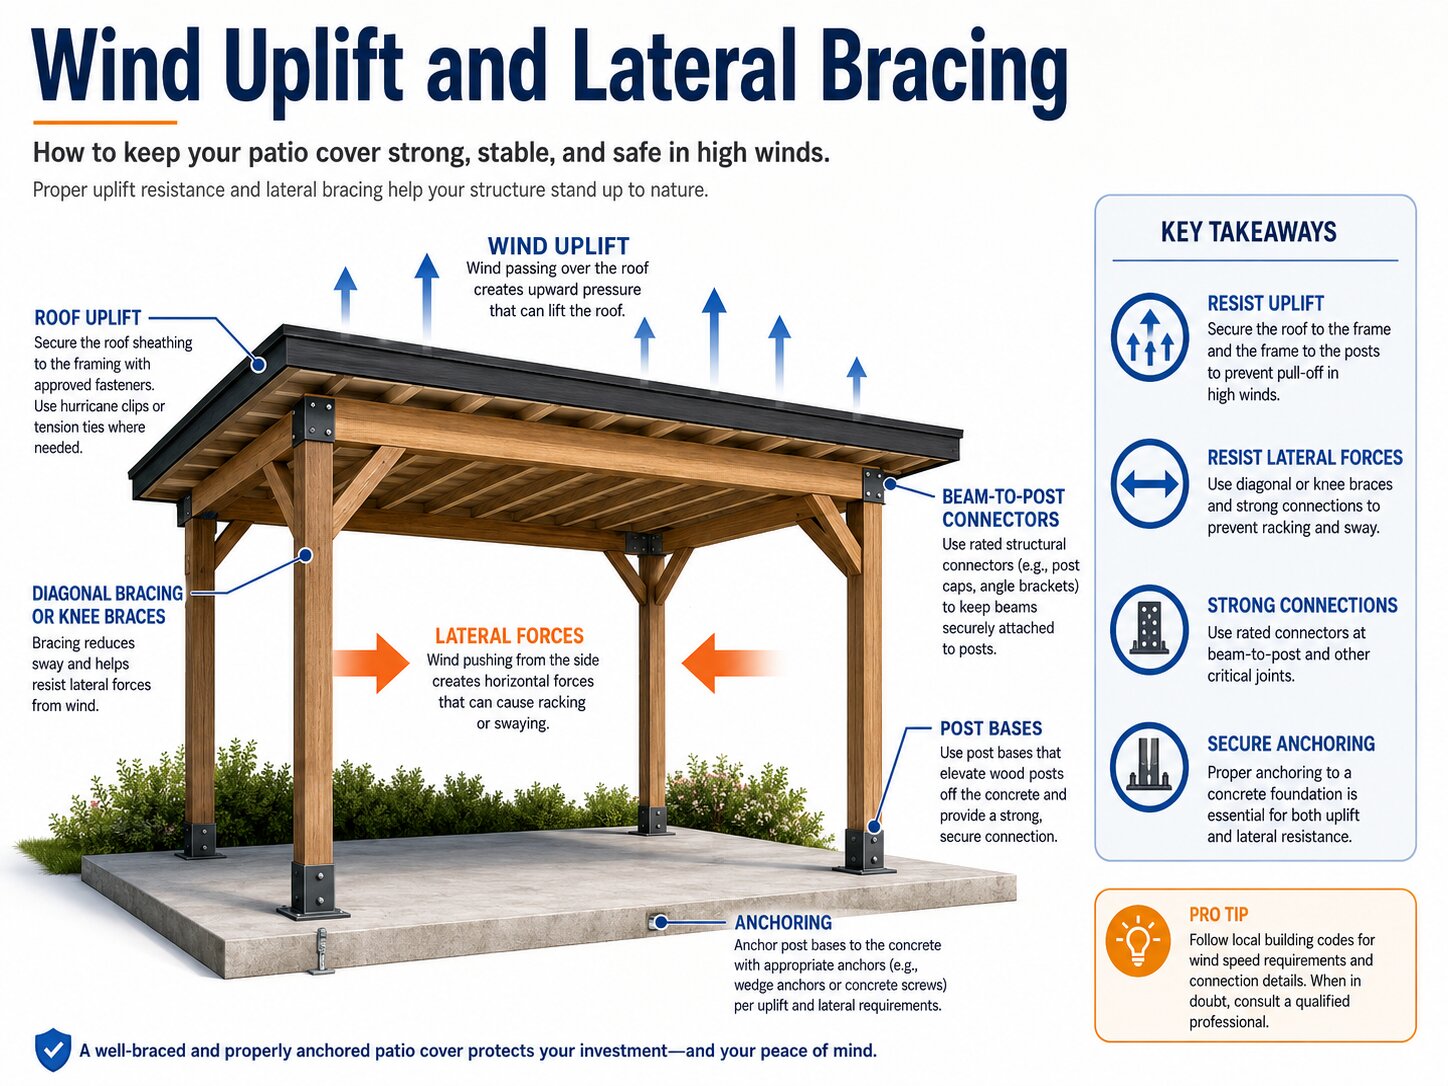
Wind Uplift, Snow Load, and Seismic Risk
A patio cover must be designed for local environmental forces.
Wind Uplift
Wind can lift the roof like a wing. This is especially important for freestanding patio covers because the structure is exposed on all sides.
High-wind areas may require:
- Stronger anchors
- Heavier connectors
- Uplift-rated hardware
- Engineered drawings
- Reduced spans
- Stronger posts and beams
- Special inspection
Coastal regions and hurricane-prone areas need extra care.
Snow Load
In snow regions, the roof must support snow accumulation. Snow load can control rafter size, beam size, post size, and footing design.
A flat or low-slope roof may hold more snow. Roof shape and nearby buildings can also affect drifting.
Seismic Risk
In seismic regions, lateral movement and anchorage matter. A tall freestanding structure may need additional bracing and connection design.
The safest approach is to ask the local building department what design loads apply to your address.
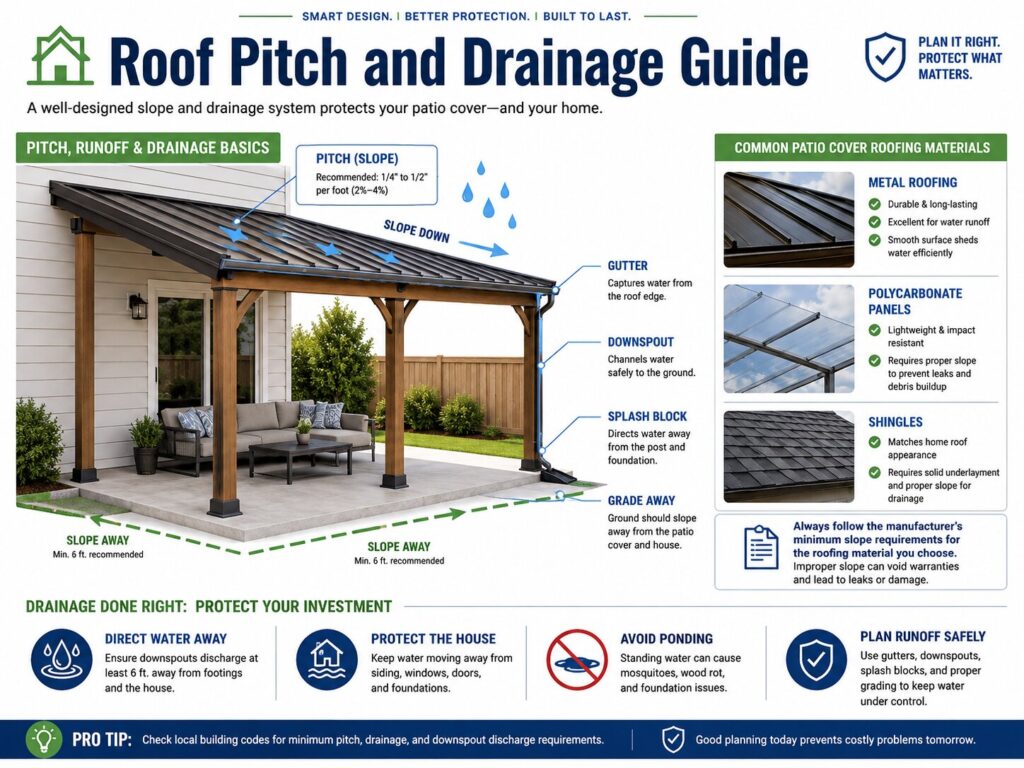
Roof Pitch, Drainage, and Runoff
A freestanding patio cover must shed water properly. Poor drainage can cause leaks, sagging, ponding water, slippery surfaces, soil erosion, and foundation problems.
Roof pitch depends on the roof material. Always follow the manufacturer’s minimum slope requirements.
Common drainage considerations include:
- Roof slope direction
- Gutter location
- Downspout placement
- Splash blocks
- Drainage away from the house
- Avoiding runoff onto neighboring property
- Avoiding water discharge near footings
- Snow shedding direction
- Ponding water risk
- Debris buildup
If the patio cover is near the house, make sure runoff does not drain toward the foundation, basement, crawl space, or exterior wall.
Patio Cover Material Options
Different cover types have different structural and maintenance needs.
| Cover Type | Main Function | Best For | Key Concern |
|---|---|---|---|
| Solid roof patio cover | Rain and sun protection | Outdoor dining, long-term use | Roof load, drainage, permits |
| Pergola | Partial shade | Garden patios, dry climates | Not full rain protection |
| Shade sail | Lightweight shade | Budget shade, modern yards | Anchor tension and wind load |
| Lattice cover | Filtered shade | Decorative patios | Limited rain protection |
| Polycarbonate panels | Light and weather protection | Bright patios, garden areas | Expansion gaps, slope, fastening |
| Fiberglass panels | Light roof cover | Budget roof panels | UV aging, fastening, slope |
| Metal roof | Durable rain protection | Modern or farmhouse patios | Condensation, noise, uplift |
| Asphalt shingle roof | Matches house roofing | Permanent structures | Roof weight and slope |
| Insulated panels | Heat reduction | Hot climates, large patios | Manufacturer span and connection limits |
| Glass roof | Bright upscale cover | Modern courtyards | Engineering, safety glass, drainage |
Do not assume that all materials can use the same frame. A roofed structure with shingles usually needs more framing than a light shade pergola.
Best Patio Cover Type by Situation
| Situation | Better Option | Why |
| Dry climate and decorative shade | Pergola | Allows airflow and filtered light |
| Budget shade project | Shade sail or simple pergola | Lower material cost, but still needs proper anchors |
| Rain protection needed | Solid roof cover | Better weather protection |
| Hot climate | Insulated patio cover | Reduces heat transfer |
| Bright garden patio | Polycarbonate cover | Allows light while blocking rain |
| Large backyard | Freestanding pavilion | Strong visual feature and flexible location |
| Snow region | Engineered solid roof | Must support snow load |
| High-wind region | Engineered roofed cover | Uplift and bracing are critical |
| Near property line | Permit-reviewed design | Setbacks and fire rules may apply |
| Outdoor kitchen | Durable roof with code review | May require electrical, gas, ventilation, and fire checks |
Safe Construction Overview
This section explains the general sequence. It is not a complete building plan.
Step 1: Define the Purpose
Decide whether the structure will provide shade only, rain protection, outdoor dining space, poolside cover, or outdoor kitchen shelter.
Do not plan to use a patio cover as a carport, garage, storage room, or habitable room unless your local building department approves that use.
Step 2: Check Local Code and Permits
Contact the building department before buying materials. Ask about permits, drawings, inspections, setbacks, loads, and footing requirements.
Also check HOA rules if your property is in an association.
Step 3: Choose the Location
Choose a location that works with:
- Property lines
- Setbacks
- Drainage
- Existing patio layout
- Sun direction
- Wind exposure
- Utility lines
- Underground pipes
- Trees and roots
- Access from the house
- Outdoor furniture layout
Call the local utility marking service before digging.
Step 4: Select the Cover Type
Choose between a solid roof, pergola, shade sail, lattice cover, metal roof, polycarbonate panels, insulated panels, or pavilion style.
The cover type affects structure, slope, fasteners, and permit requirements.
Step 5: Design the Load Path
Plan how the roof loads transfer to rafters, beams, posts, footings, and soil. Include wind uplift and lateral bracing.
Do not guess post, beam, or rafter sizes. Use approved plans, span tables, manufacturer instructions, or professional design.
Step 6: Plan Footings
Footing depth and size must follow local requirements. Consider frost depth, soil, roof load, wind uplift, and inspection rules.
Do not assume an existing patio slab is enough to support posts. Many slabs are not designed as structural footings.
Step 7: Plan Posts, Beams, Rafters, and Bracing
Select materials based on approved design. Include proper connectors, post bases, post caps, rafter ties, and bracing.
Step 8: Plan Roof Pitch and Drainage
Confirm minimum slope for the roofing material. Plan gutters, downspouts, splash blocks, or drainage extensions.
Keep water away from the house and footings.
Step 9: Build According to Approved Plans
Follow approved drawings, manufacturer instructions, and inspection requirements. Use the fasteners and connectors specified in the plan.
Step 10: Inspect and Maintain
Complete inspections if required. After installation, check the structure regularly for movement, rust, rot, loose fasteners, drainage problems, and roof damage.
Checklist Before Building a Freestanding Patio Cover
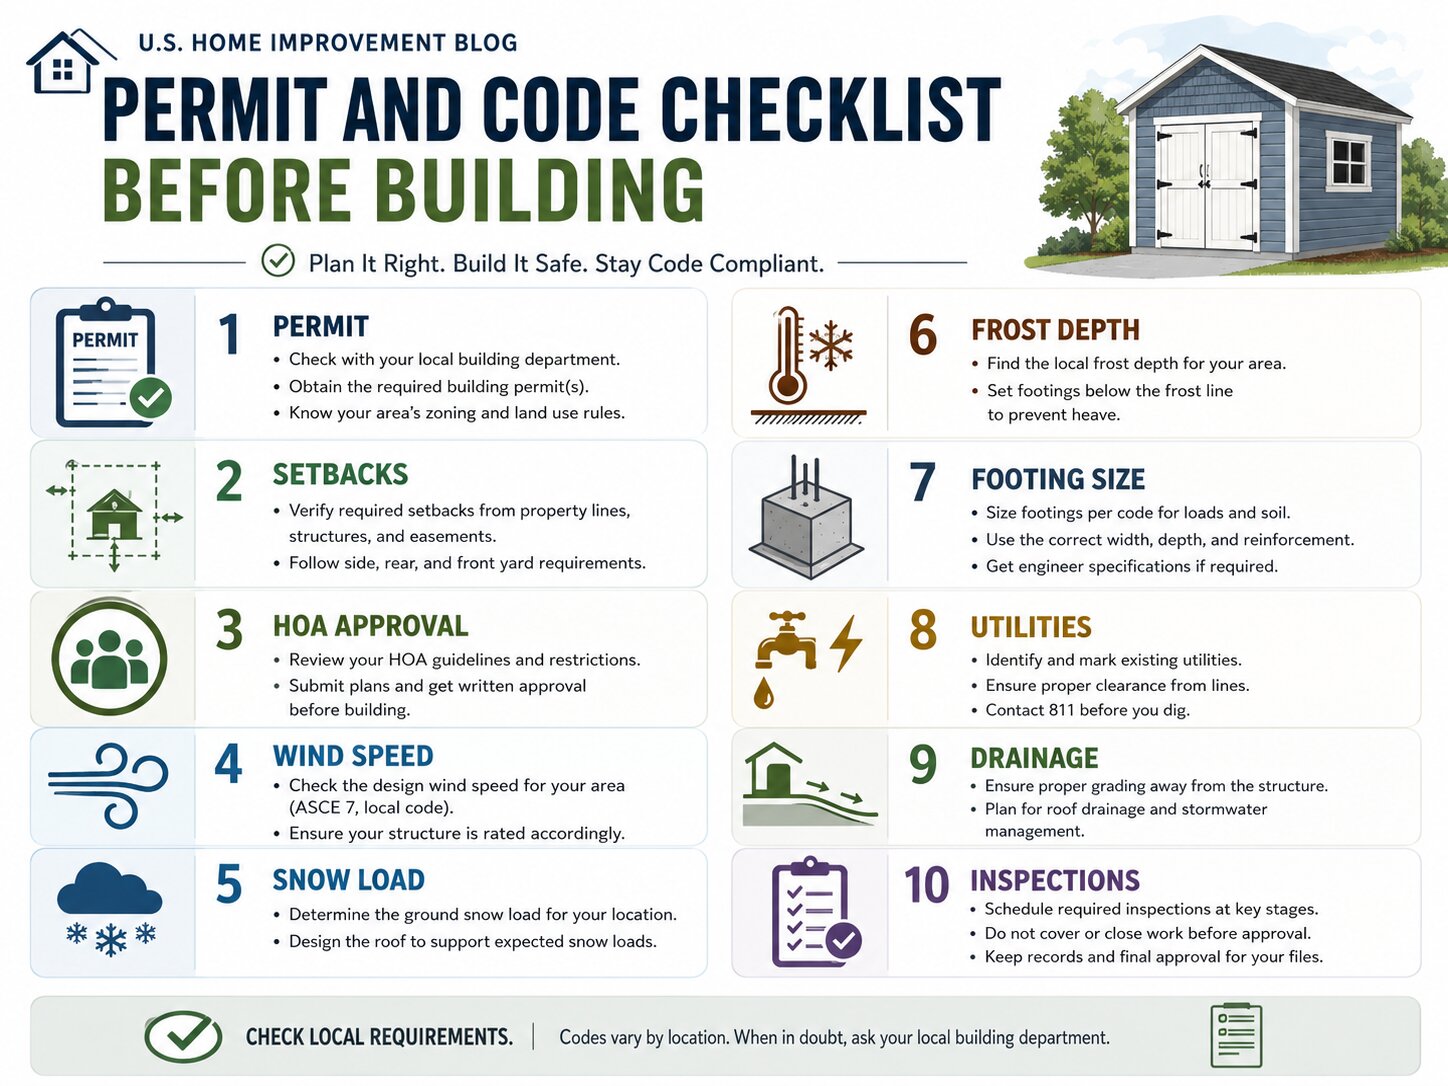
Use this checklist before construction.
Code and Permit
- Check permit requirements.
- Confirm zoning rules.
- Confirm setbacks.
- Confirm height limits.
- Confirm lot coverage limits.
- Ask whether engineered drawings are needed.
- Ask whether inspections are required.
- Confirm the structure’s permitted use.
Site Conditions
- Locate underground utilities.
- Check soil condition.
- Check drainage direction.
- Check nearby trees and roots.
- Check slope of the yard.
- Check flood risk if relevant.
- Check wind exposure.
Structural Design
- Confirm design wind speed.
- Confirm snow load.
- Confirm frost depth.
- Confirm footing size and depth.
- Confirm post size.
- Confirm beam size.
- Confirm rafter size and spacing.
- Confirm bracing method.
- Confirm connector type.
- Confirm fastener corrosion rating.
Roof and Drainage
- Choose roof material.
- Confirm minimum roof slope.
- Plan gutters and downspouts.
- Direct water away from the house.
- Direct water away from footings.
- Avoid draining onto neighboring property.
- Plan for debris cleaning.
HOA and Property Rules
- Check HOA approval.
- Review architectural guidelines.
- Check easements.
- Check utility access.
- Check fence and visibility rules.
- Check fire separation rules if near property lines.
Electrical and Outdoor Kitchen Add-Ons
If you plan to add lights, fans, outlets, heaters, speakers, gas appliances, or an outdoor kitchen, ask about additional permits.
Electrical and gas work should follow code and may require licensed professionals.
When to Hire a Contractor or Structural Engineer
Hire a qualified contractor or structural engineer if:
- The structure is large.
- The roof is heavy.
- The posts are tall.
- The spans are long.
- You live in a high-wind region.
- You live in a snow-load region.
- You live in a seismic region.
- The patio cover is near a property line.
- You want to add electrical or gas systems.
- The structure will cover an outdoor kitchen.
- You are unsure about footing size.
- You are unsure about post and beam sizes.
- You do not know how to design bracing.
- Your local building department requires engineered plans.
A professional design can prevent failure, permit problems, and expensive repairs.
Common Mistakes to Avoid
Mistake 1: Using Universal Footing Dimensions
Footings are not one-size-fits-all. Depth and size depend on local code, frost depth, soil, wind, snow, and roof load.
Mistake 2: Assuming a Patio Slab Can Hold Posts
A concrete patio slab may not be designed for structural posts. Separate footings may be required.
Mistake 3: Burying Posts Without Understanding Rot Risk
Posts in soil or concrete can be exposed to moisture. Use approved materials, drainage details, and connectors.
Mistake 4: Choosing Lumber Sizes by Guessing
Posts, beams, and rafters must match span and load. Guessing can lead to sagging or failure.
Mistake 5: Ignoring Lateral Bracing
A freestanding structure needs resistance against side movement. Bracing matters.
Mistake 6: Ignoring Wind Uplift
Wind can lift a roof. Use proper anchors and connectors.
Mistake 7: Ignoring Snow Load
Snow can add heavy roof load. Snow regions require careful design.
Mistake 8: Using Indoor Fasteners Outside
Outdoor structures need rated, corrosion-resistant fasteners and connectors.
Mistake 9: Adding Solid Panels to a Pergola Later
Adding panels changes loads, wind resistance, and drainage. Plan solid coverage before building.
Mistake 10: Skipping Permits
Unpermitted work can create fines, safety risks, insurance issues, and resale problems.
Mistake 11: Letting Water Drain Toward the House
Drainage must move water away from the foundation, not toward it.
Mistake 12: Treating a Patio Cover Like a Habitable Room
A patio cover is not automatically approved as enclosed living space, storage, garage, or carport.
Design Ideas for a Freestanding Patio Cover
1. Simple Wood Pergola
A wood pergola gives filtered shade and a warm outdoor look. It works well in dry climates and garden patios.
Best for:
- Decorative shade
- Garden seating
- Outdoor dining
- Casual backyard style
Watch out for:
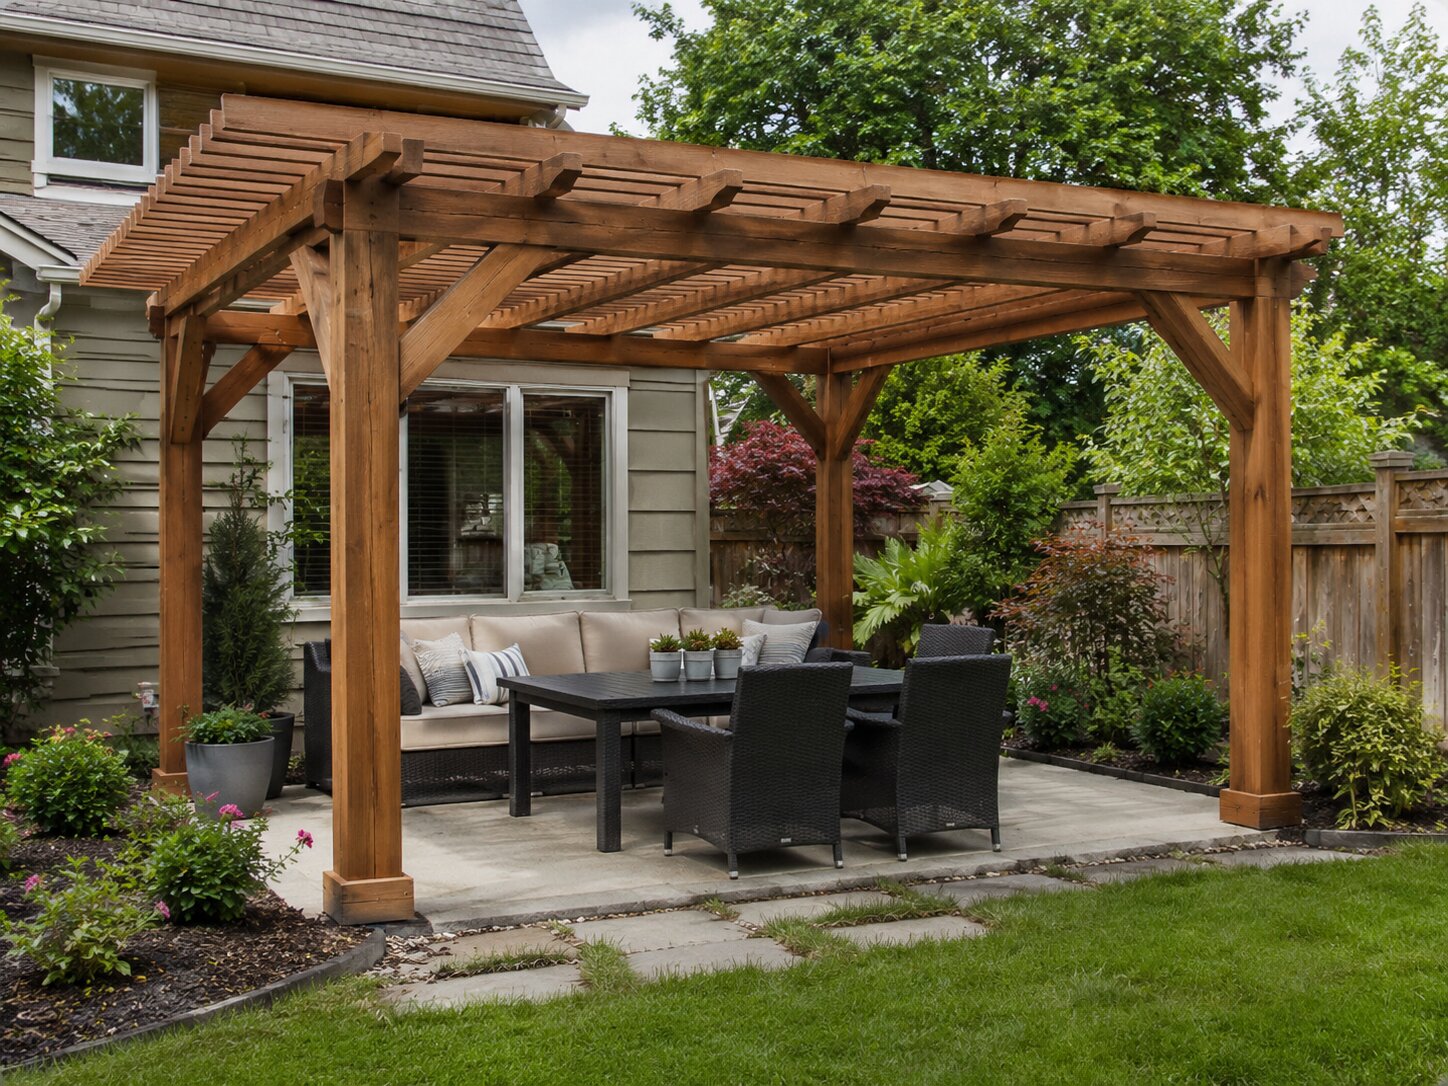
It does not provide full rain protection unless panels or fabric are added. Adding panels later changes loads and drainage.
2. Solid Roof Patio Cover
A solid roof gives better weather protection. It works well for outdoor dining, lounge areas, and furniture protection.
Best for:
- Rain protection
- Long-term outdoor living
- Covered seating
- Patio dining
Watch out for:
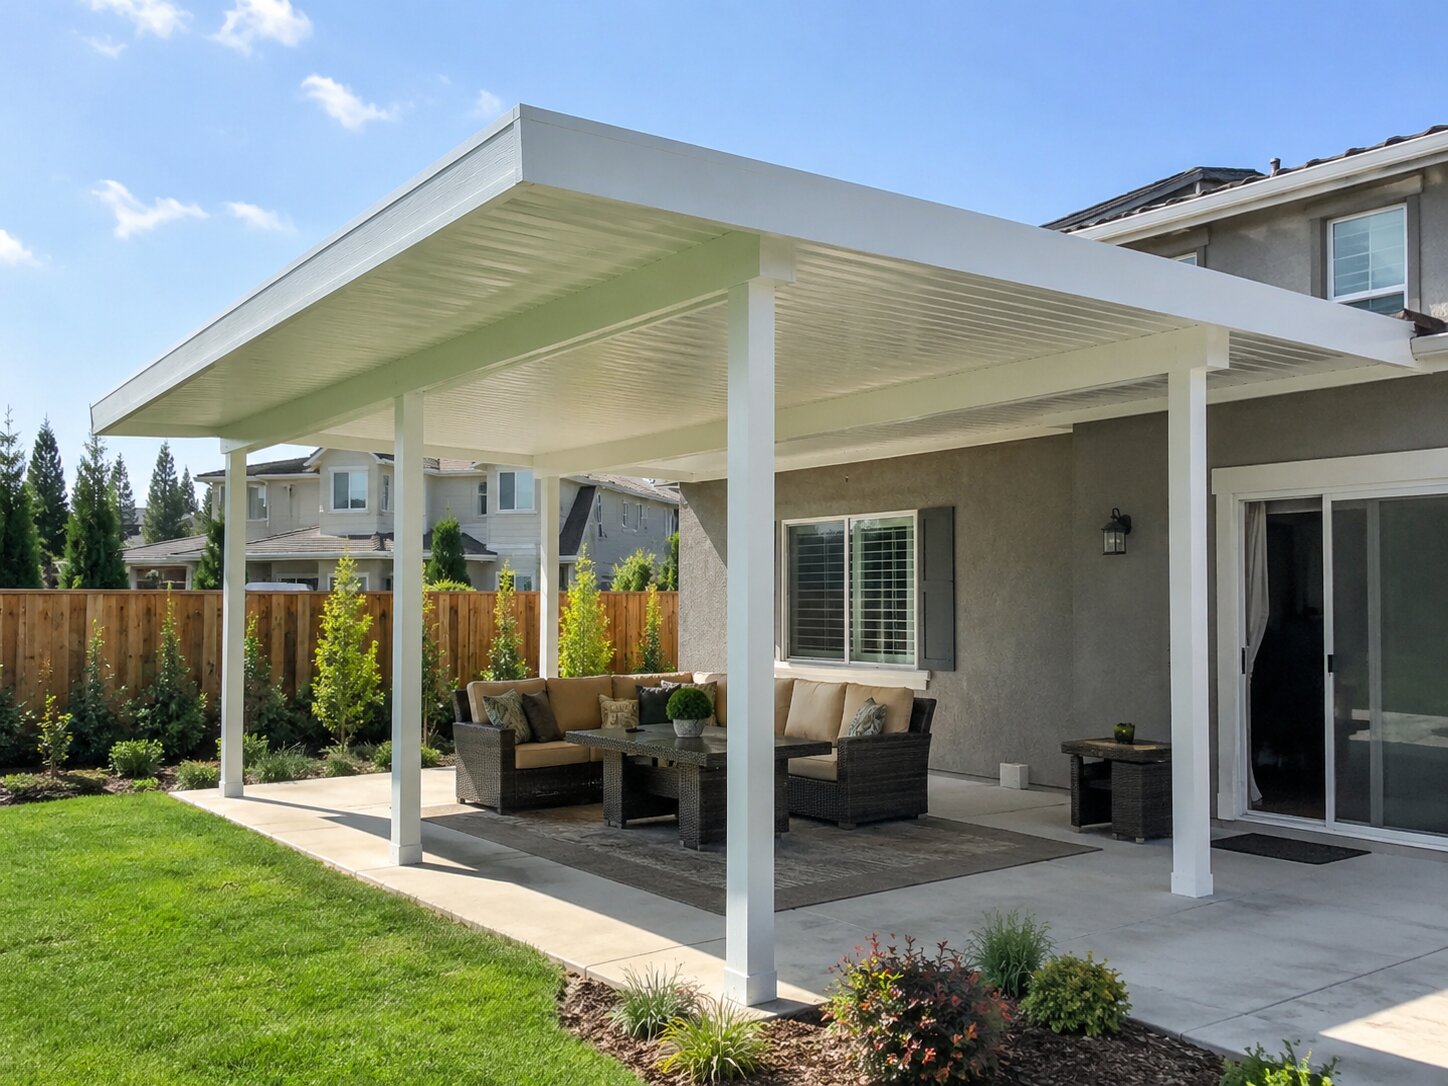
It needs stronger framing, drainage planning, and likely permit approval.
3. Metal Roof Patio Cover
Metal roofing is durable and can work well for freestanding structures.
Best for:
- Rain protection
- Modern design
- Farmhouse style
- Long service life
Watch out for:
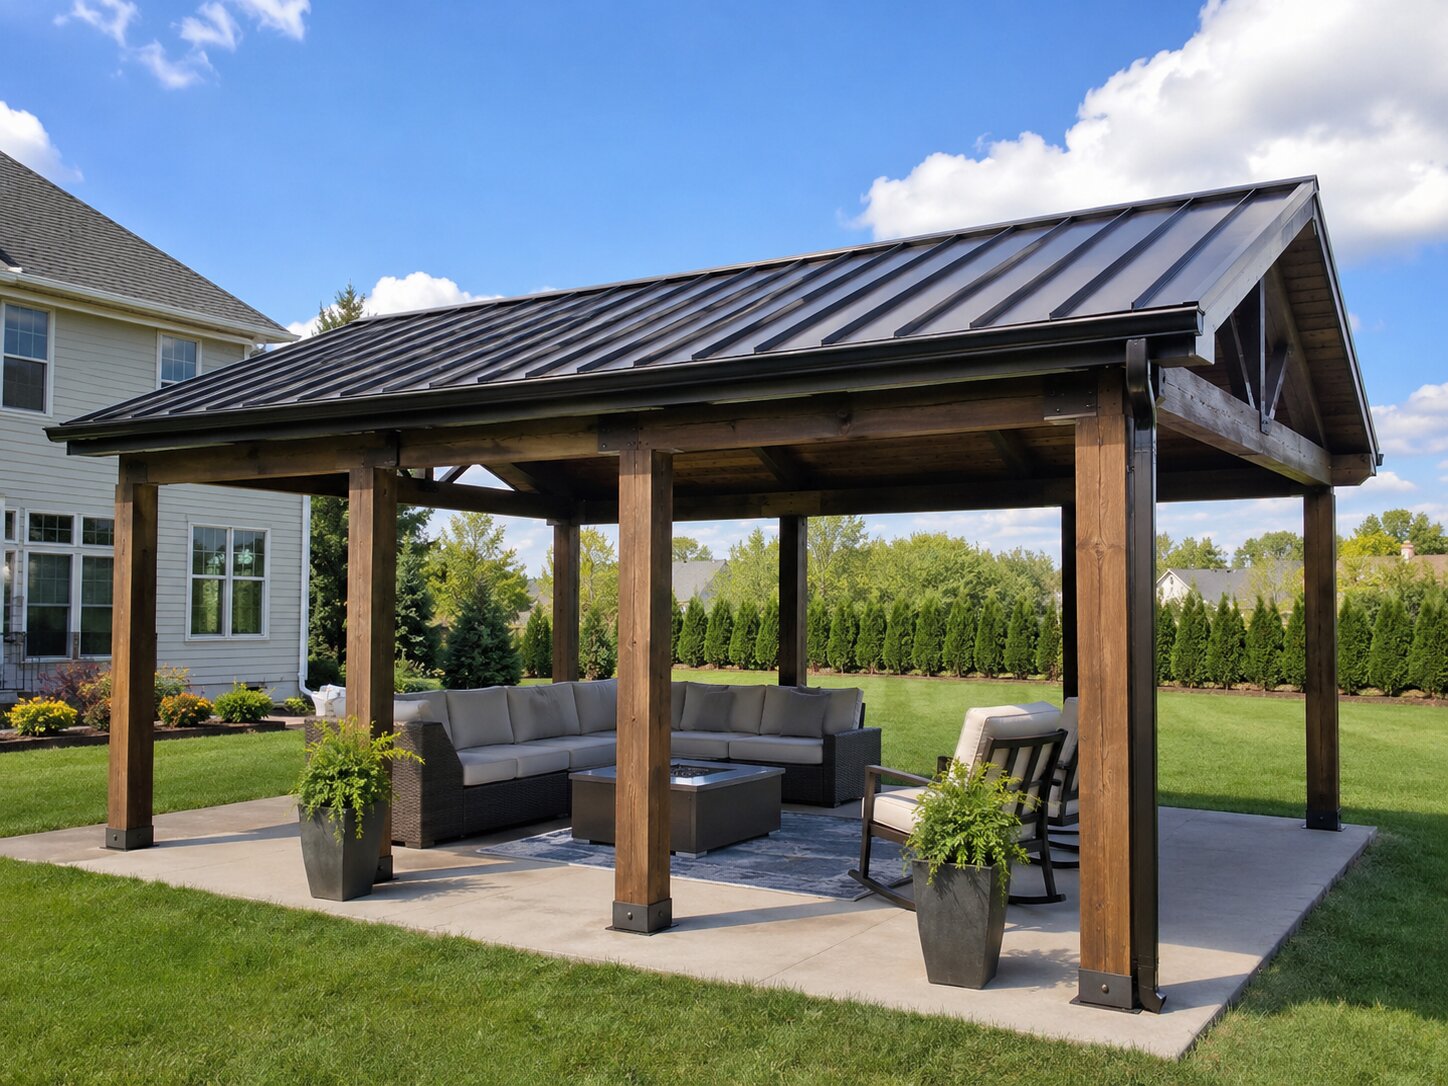 Metal roofs need proper fastening, slope, underlayment, condensation planning, and uplift resistance.
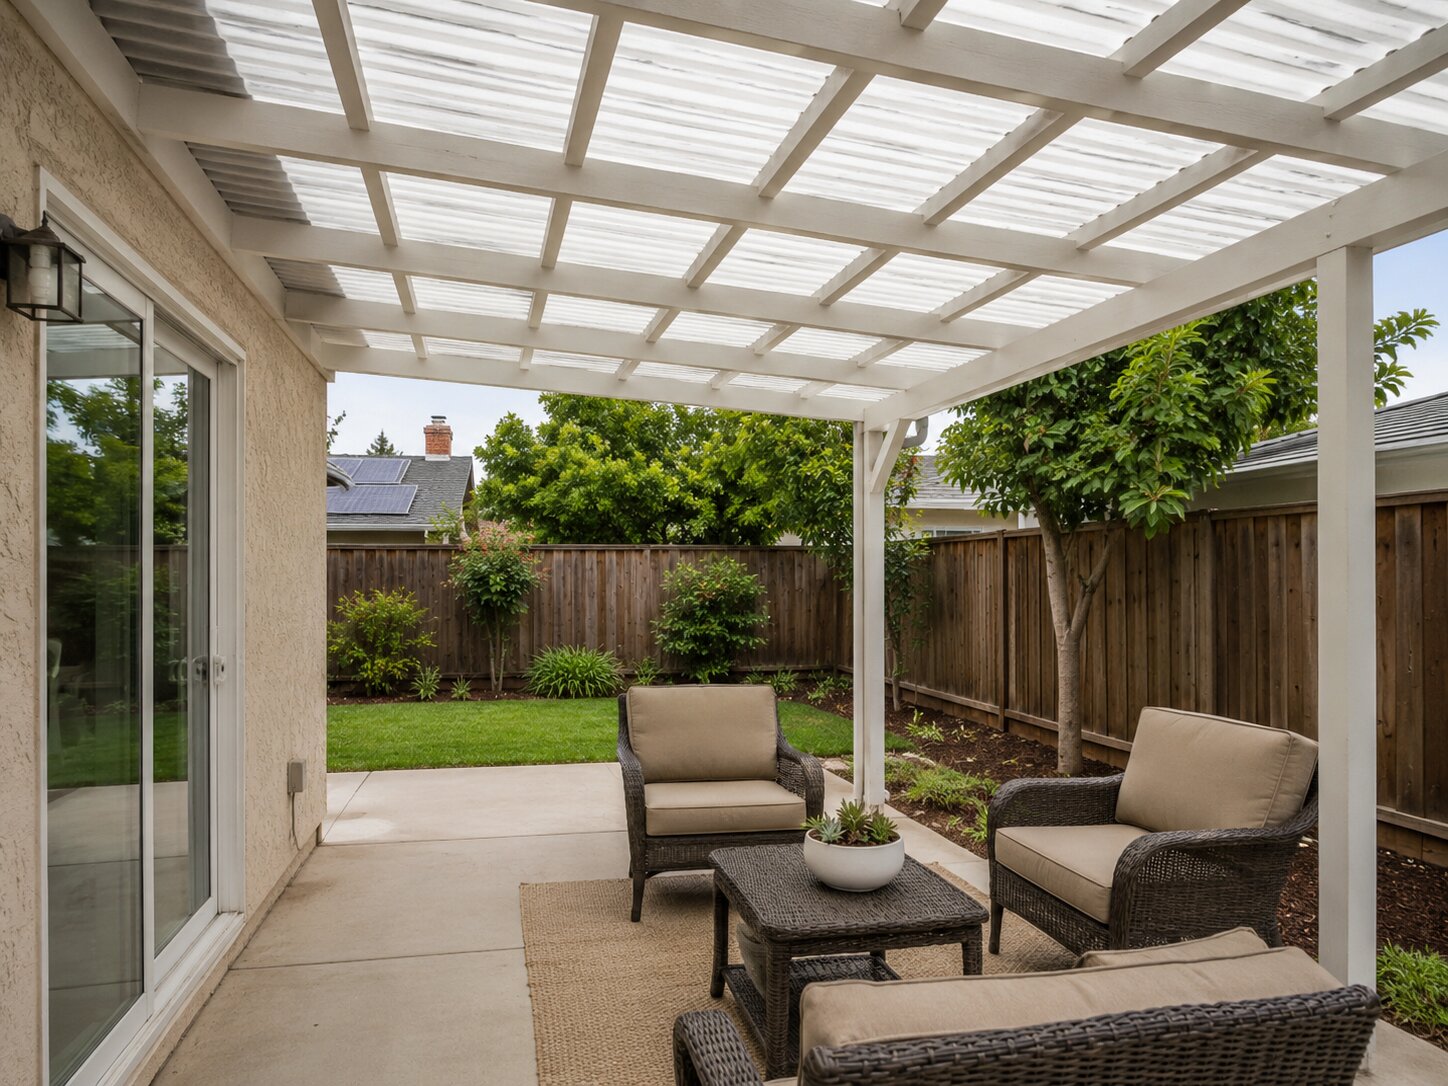
4. Polycarbonate Patio Cover
Polycarbonate panels allow natural light while providing some weather protection.
Best for:
- Garden patios
- Light-filled spaces
- Small outdoor seating areas
- Areas needing both shade and daylight
Watch out for:
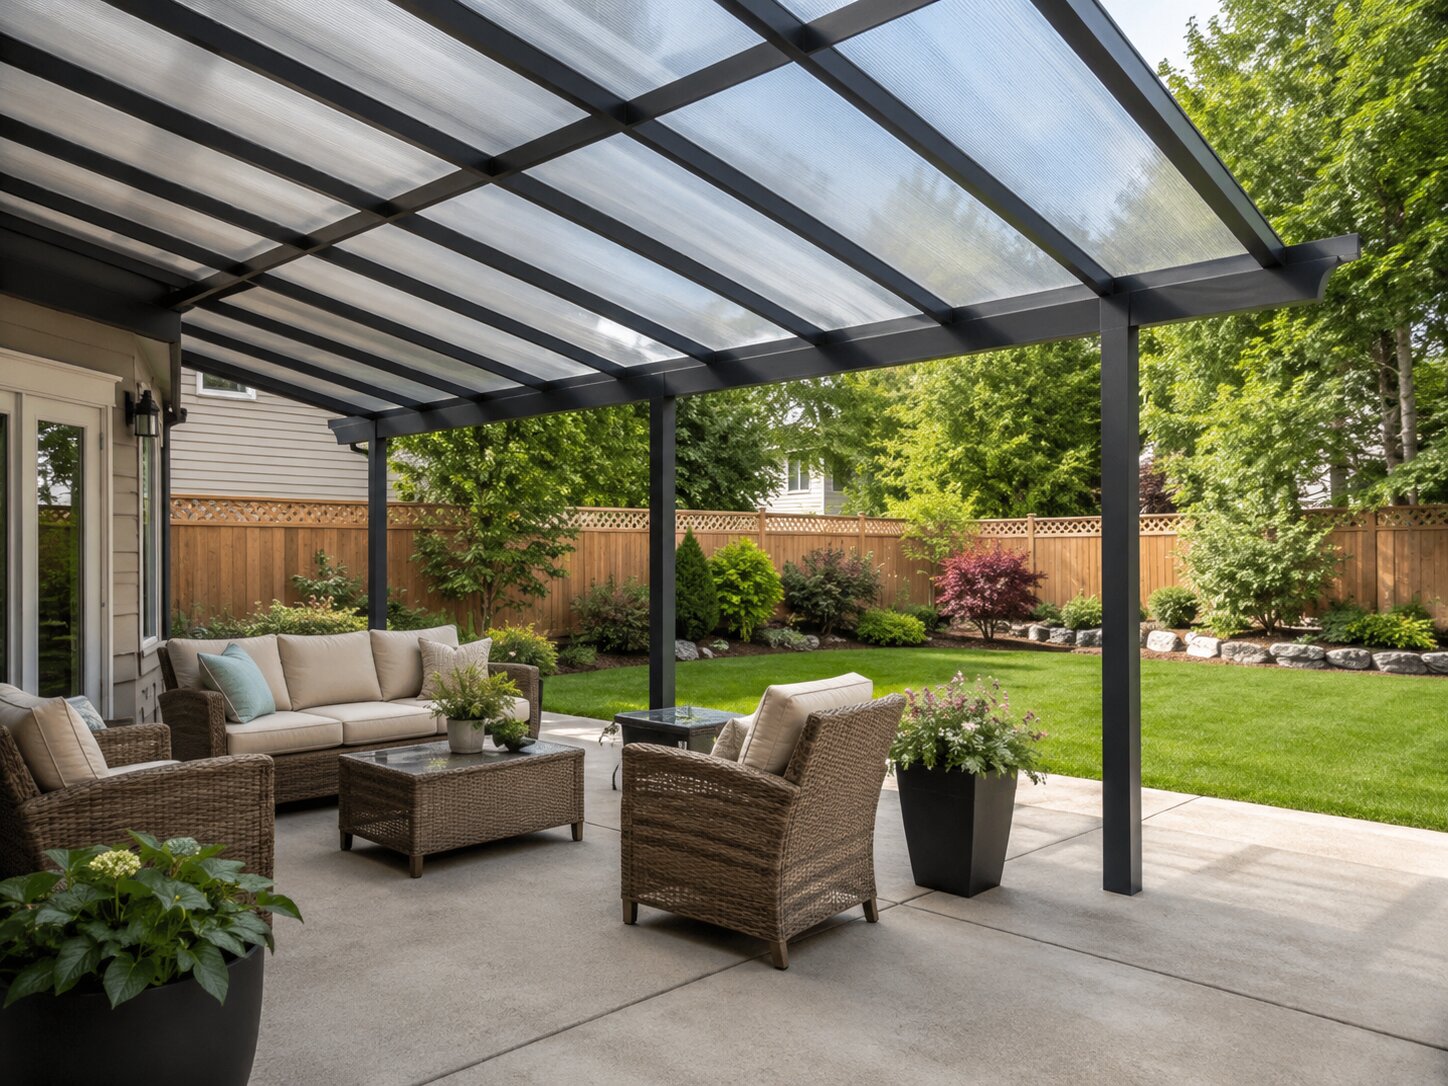 Panels need correct support spacing, expansion gaps, slope, and manufacturer-approved fasteners.
5. Insulated Patio Cover
Insulated roof panels can help reduce heat transfer and create a more comfortable covered space.
Best for:
- Hot climates
- Outdoor kitchens
- Large patios
- Year-round outdoor living
Watch out for:
 Follow manufacturer span tables, connector details, and flashing instructions.
6. Freestanding Patio Pavilion
A pavilion creates a complete outdoor room feel without attaching to the house.
Best for:
- Large yards
- Outdoor kitchens
- Poolside patios
- Entertaining areas
Watch out for:
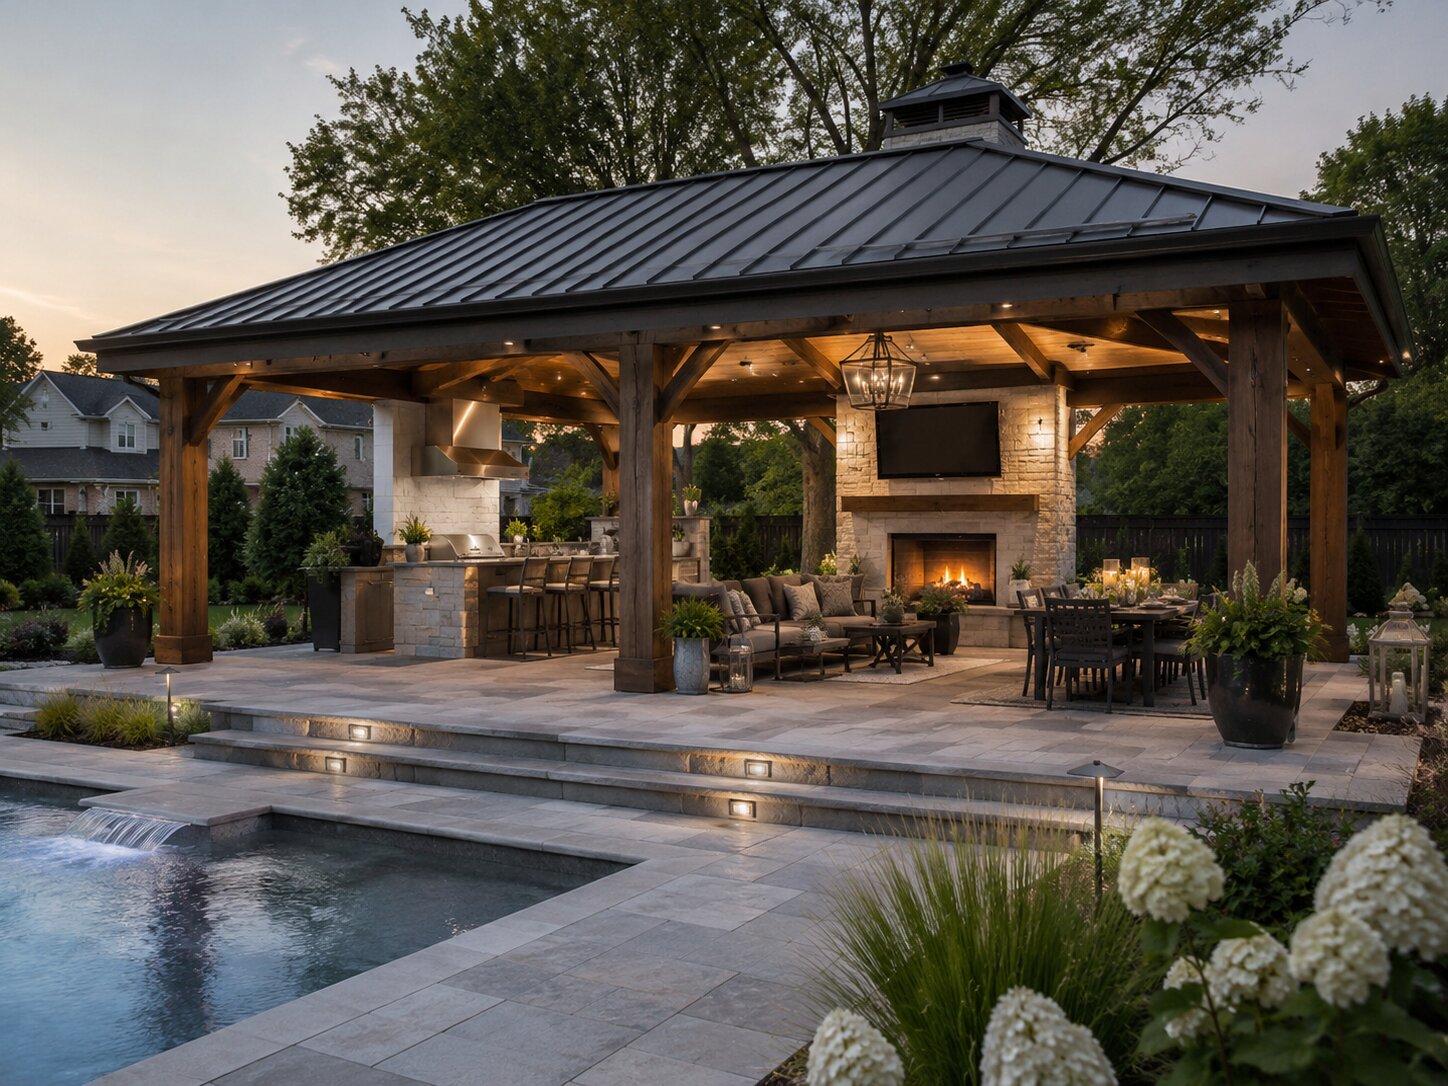 It still needs footings, bracing, wind resistance, and permit review.
7. Lattice Patio Cover
A lattice cover provides filtered shade while keeping the patio open and airy.
Best for:
- Partial shade
- Decorative outdoor spaces
- Garden areas
- Mild climates
Watch out for:
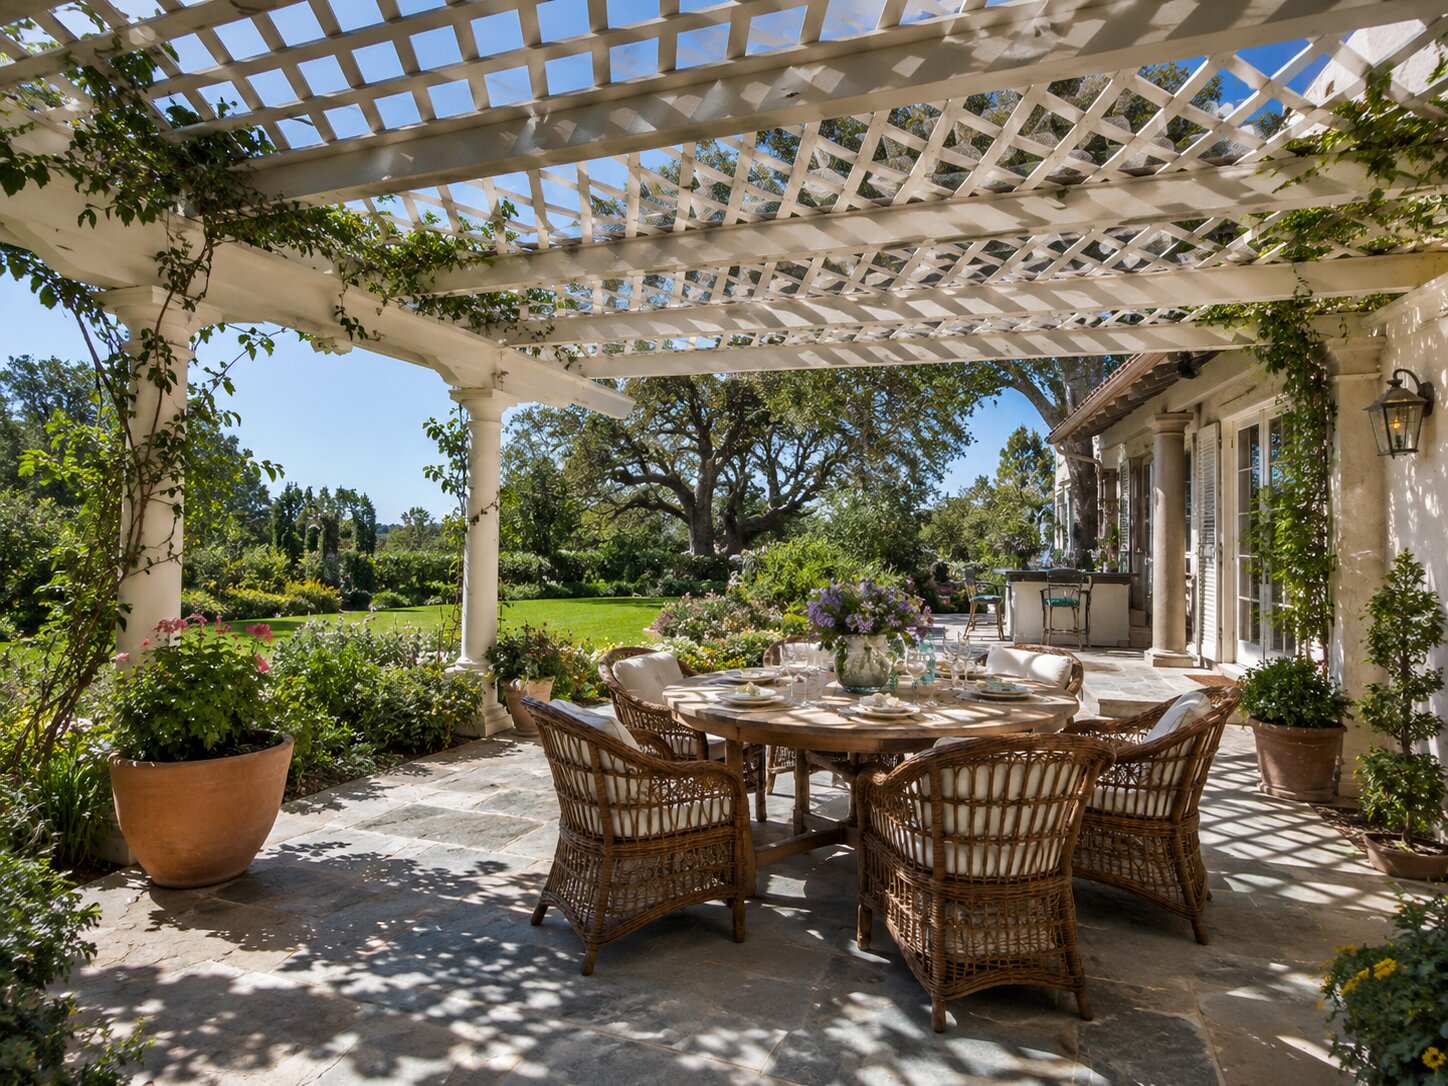 It does not provide full rain protection.
8. Shade Sail Cover
A shade sail can be modern, affordable, and flexible.
Best for:
- Budget shade
- Small patios
- Poolside shade
- Modern outdoor spaces
Watch out for:
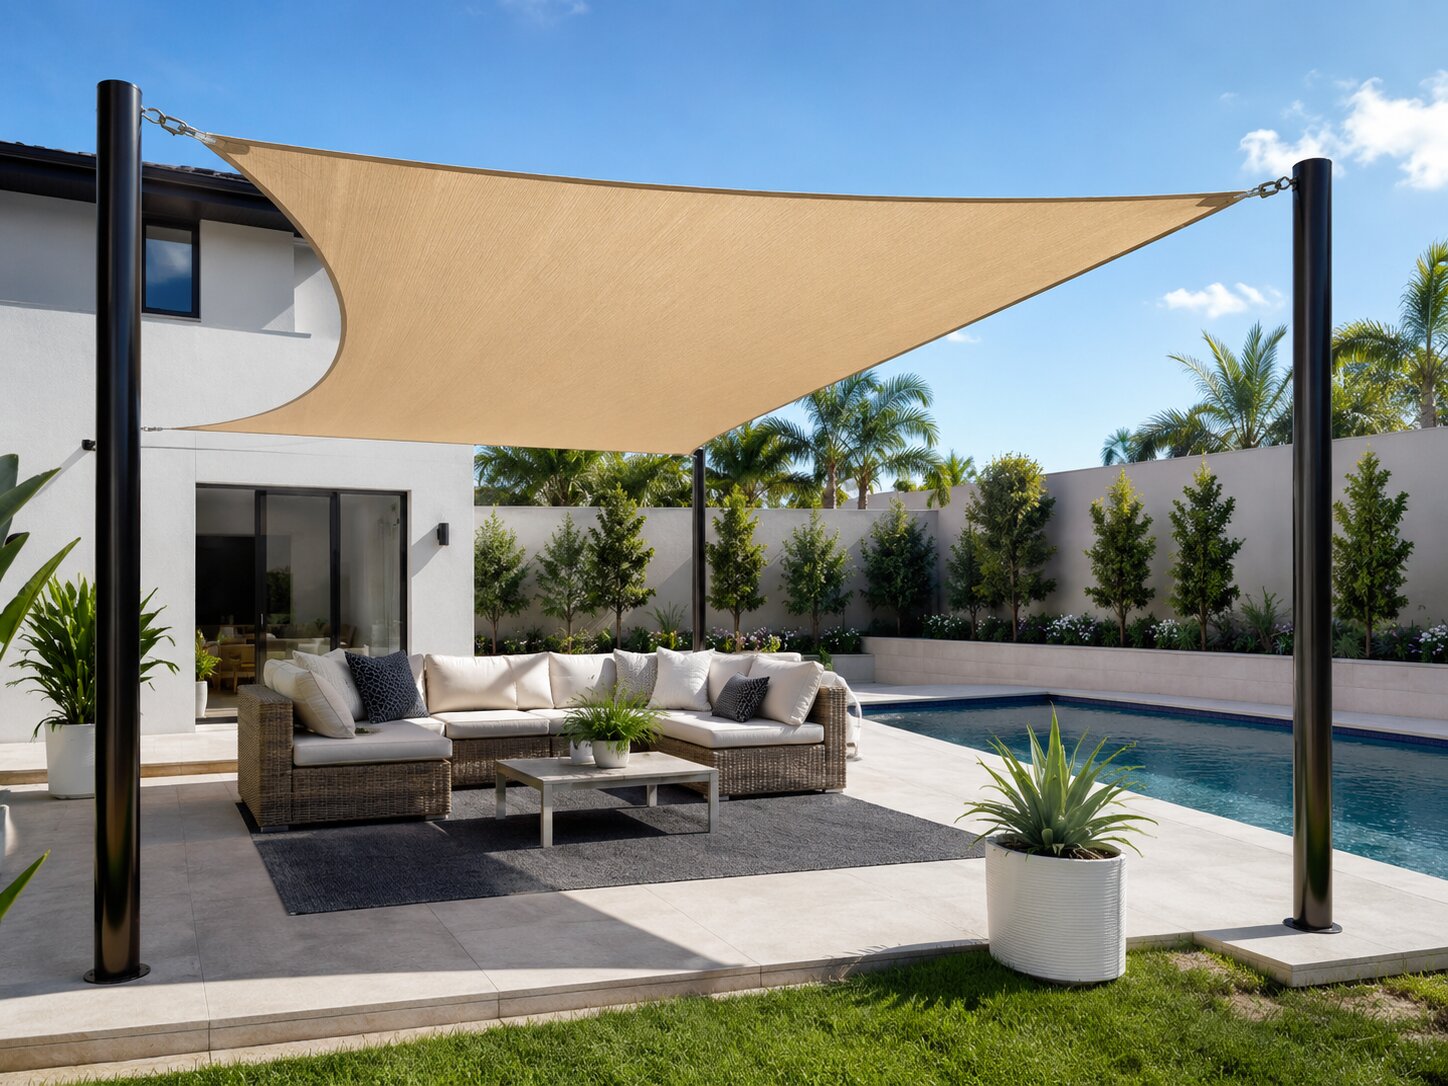 Anchor tension and wind load are critical. Attachment points must be designed for the forces.
9. Fiberglass Panel Cover
Fiberglass panels can provide a lightweight roof option for some patio covers.
Best for:
- Budget roof panels
- Light rain protection
- Utility patios
- Simple shade structures
Watch out for:
 UV exposure, panel fastening, slope, and brittleness over time should be considered.
10. Outdoor Kitchen Cover
A freestanding cover over an outdoor kitchen can create a comfortable cooking and dining space.
Best for:
- Large backyards
- Grill stations
- Outdoor bars
- Entertaining spaces
Watch out for:
Gas, electrical, ventilation, clearance, fire safety, and permit requirements may apply.
Maintenance After Building
A freestanding patio cover needs regular inspection.
Check at least once or twice a year for:
- Loose fasteners
- Rusted connectors
- Cracked posts
- Wood rot
- Insect damage
- Beam sagging
- Rafter movement
- Roof panel damage
- Gutter clogs
- Drainage issues
- Soil erosion near footings
- Post base corrosion
- Bracing movement
- Leaks or water stains
After strong storms, inspect the structure again. Look for uplift damage, loose panels, leaning posts, shifted footings, or damaged connectors.
FAQ About Building a Freestanding Patio Cover
What is a freestanding patio cover?
A freestanding patio cover is an independent roof or shade structure built over a patio. It is supported by its own posts, beams, footings, and connectors instead of being attached to the house.
Do I need a permit to build a freestanding patio cover?
Many U.S. locations require a permit for roofed outdoor structures. Requirements vary by city and county. Always ask your local building department before starting.
How deep should footings be for a freestanding patio cover?
There is no universal depth. Footing depth depends on local code, frost depth, soil conditions, roof load, wind uplift, and snow load.
Can I build a patio cover on an existing concrete slab?
Not always. Many patio slabs are not designed to support roof posts. Separate footings may be required.
Are 4×4 posts enough for a patio cover?
It depends on the size, height, load, span, wind exposure, and local code. Do not choose post size by guesswork.
What roof material is best for a patio cover?
There is no single best material. Metal, shingles, polycarbonate, fiberglass, insulated panels, and pergola slats can all work when matched to the structure and local conditions.
Does a freestanding patio cover need bracing?
Yes, many freestanding structures need bracing to resist lateral movement and wind forces. The exact bracing method depends on design and code.
Can a freestanding patio cover be used as a carport?
Not automatically. Patio covers are often classified for outdoor living use. Carport use may require different code approval.
Can I add walls later?
Adding walls can change the structure’s classification, wind loads, ventilation, fire rules, and permit requirements. Check local code first.
Can I add lighting or a ceiling fan?
Yes, but electrical work must follow code and may require a permit or licensed electrician.
What is continuous load path?
Continuous load path means the roof, rafters, beams, posts, connectors, footings, and soil work together to transfer loads safely.
What is the biggest mistake homeowners make?
The biggest mistake is treating a freestanding patio cover as a simple shade project and ignoring permit, footing, bracing, wind uplift, snow load, and structural connections.
Conclusion
A freestanding patio cover can improve a backyard by adding shade, comfort, and usable outdoor living space. It can also reduce the risk of roof-wall leaks because it does not need to attach to the house.
However, it is still a structural project. It must be planned for local code, permits, footing depth, soil conditions, wind uplift, snow load, post size, beam span, rafter spacing, roof pitch, drainage, connectors, and bracing.
The safest approach is to plan first, check local requirements, use approved designs, and hire a qualified contractor or structural engineer when the project exceeds basic DIY skill. A well-built patio cover can last for years. A poorly designed one can move, leak, rot, or fail.
Build for comfort, but plan for safety.
Sources:
- ICC Digital Codes, “2021 IRC Appendix AH: Patio Covers”
Used for patio cover scope and permitted-use context, including that patio covers may be detached or attached and are intended for recreational outdoor living, not carports, garages, storage rooms, or habitable rooms. (ICC Digital Codes) - Building America Solution Center, “Porches, Carports, and Deck Attachments”
Used for continuous load path, wind uplift, lateral load, structural connector, and outdoor structure safety guidance. (Building America Solution Center) - Simpson Strong-Tie, “Deck Connection and Fastening Guide”
Used for general structural connection concepts, including ledger connection, joist-to-beam connection, beam-to-post connection, and code-based fastening guidance. (Simpson Strong-Tie) - Simpson Strong-Tie, “Deck Connection and Fastening Guide PDF”
Used for post-to-footing and lateral or uplift connection context. (buildsite.com) - Insurance Institute for Business & Home Safety, “Continuous Load Path”
Used for explaining how a continuous load path transfers wind forces from roof to foundation or ground. (IBHS)
***
Also read: How to Clean Concrete Patio Without Pressure Washer