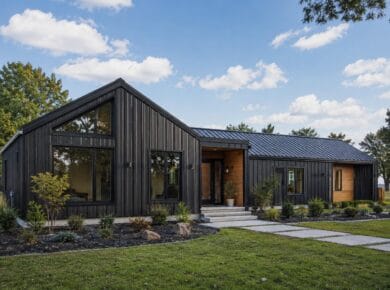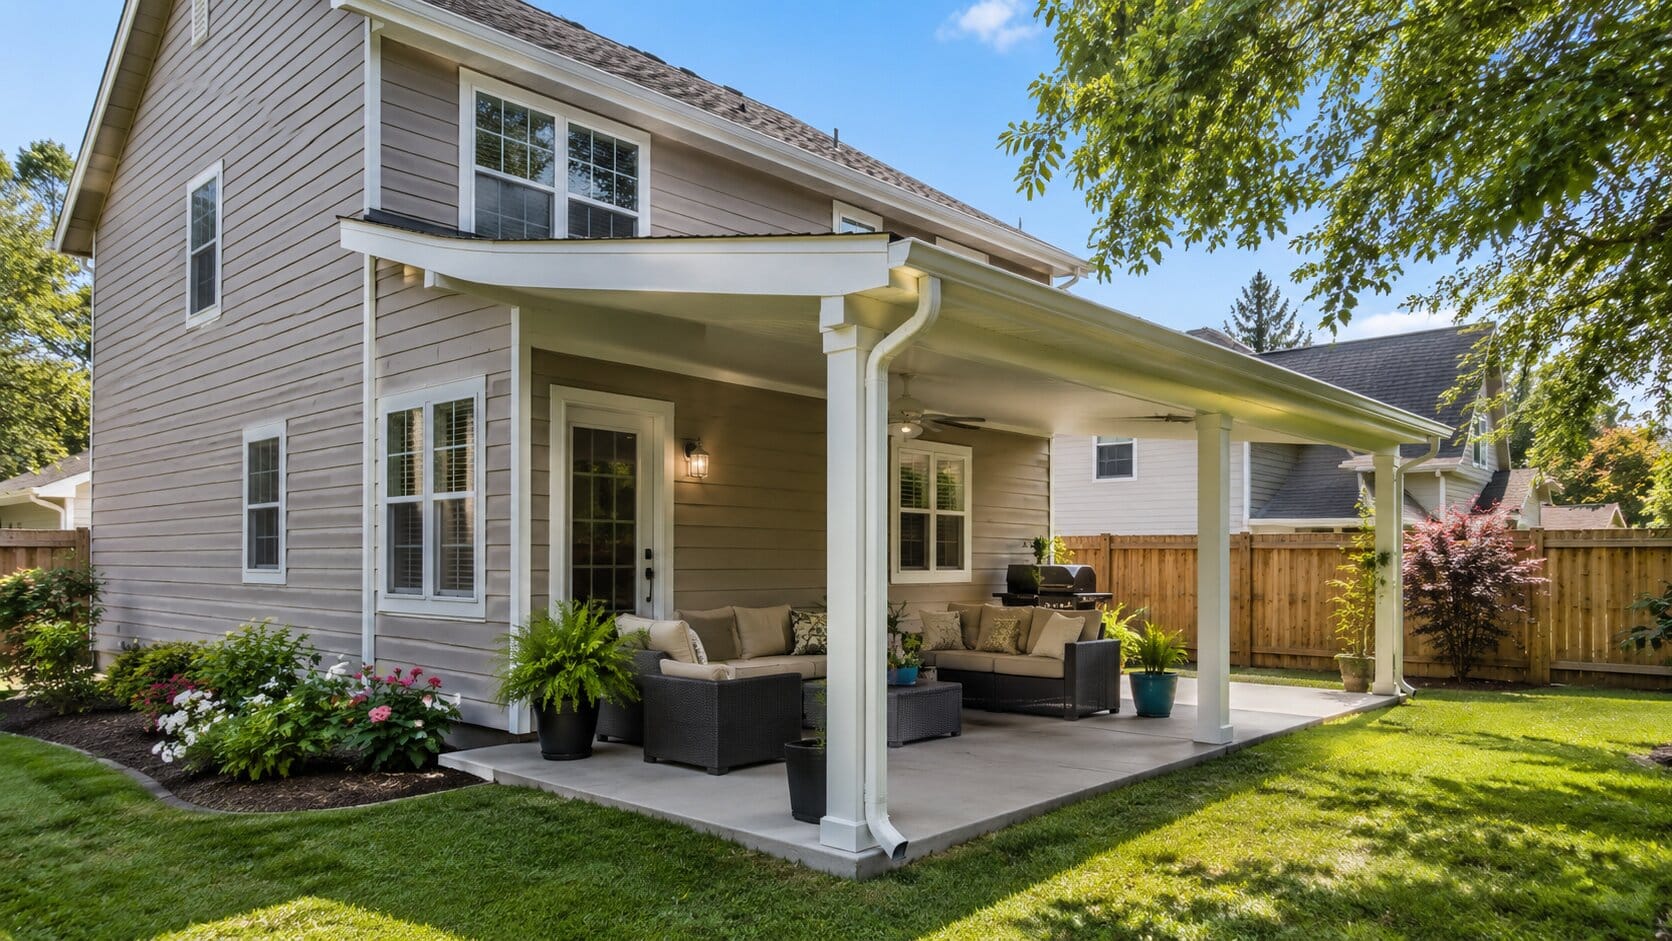
Attaching a patio roof to an existing house can make an outdoor area more comfortable, shaded, and usable in different weather. It can protect a patio from sun and rain, create a better outdoor dining area, and improve the function of a backyard.
However, an attached patio roof is not just a decorative add-on. It is a structural project. The roof must resist gravity loads, wind uplift, lateral movement, rainwater, and in some areas, snow or seismic forces. It also has to connect to the existing house without causing leaks, rot, wall damage, or roof failure.
In the United States, many attached patio roofs require a building permit. Local rules vary by city, county, state, climate zone, wind zone, snow-load area, wildfire zone, coastal zone, and HOA community. Before building, homeowners should check local code, permit rules, structural requirements, drainage details, and inspection requirements.
This guide explains how to plan an attached patio roof safely, what attachment methods are commonly used, what components matter, what mistakes to avoid, and when to call a contractor or structural engineer.
Important Safety Note
This article is a planning guide, not a complete construction plan. Do not build an attached patio roof based only on a blog article. Final design must match your local building code, site loads, house framing, roof type, foundation conditions, manufacturer instructions, and permit requirements.
If the patio roof will attach to your house, carry roof loads, change drainage, cut into the existing roof, or modify structural framing, consult your local building department, licensed contractor, or structural engineer.
What Is an Attached Patio Roof?
An attached patio roof is a roof structure connected to an existing house. It covers an outdoor living area such as a patio, terrace, or backyard seating space.
A patio roof may be attached to:
- An exterior wall
- A ledger board fastened to structural framing
- Existing roof framing
- A new beam supported by posts
- A manufactured patio cover system
- A roof extension designed as part of a structural remodel
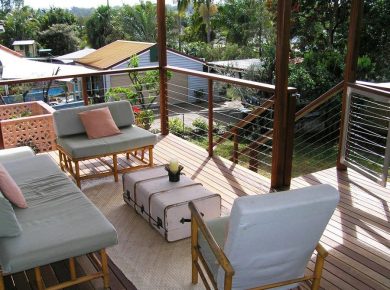
A patio roof is different from a pergola, awning, or shade sail. Those systems may provide shade, but they do not always function as a full roof.
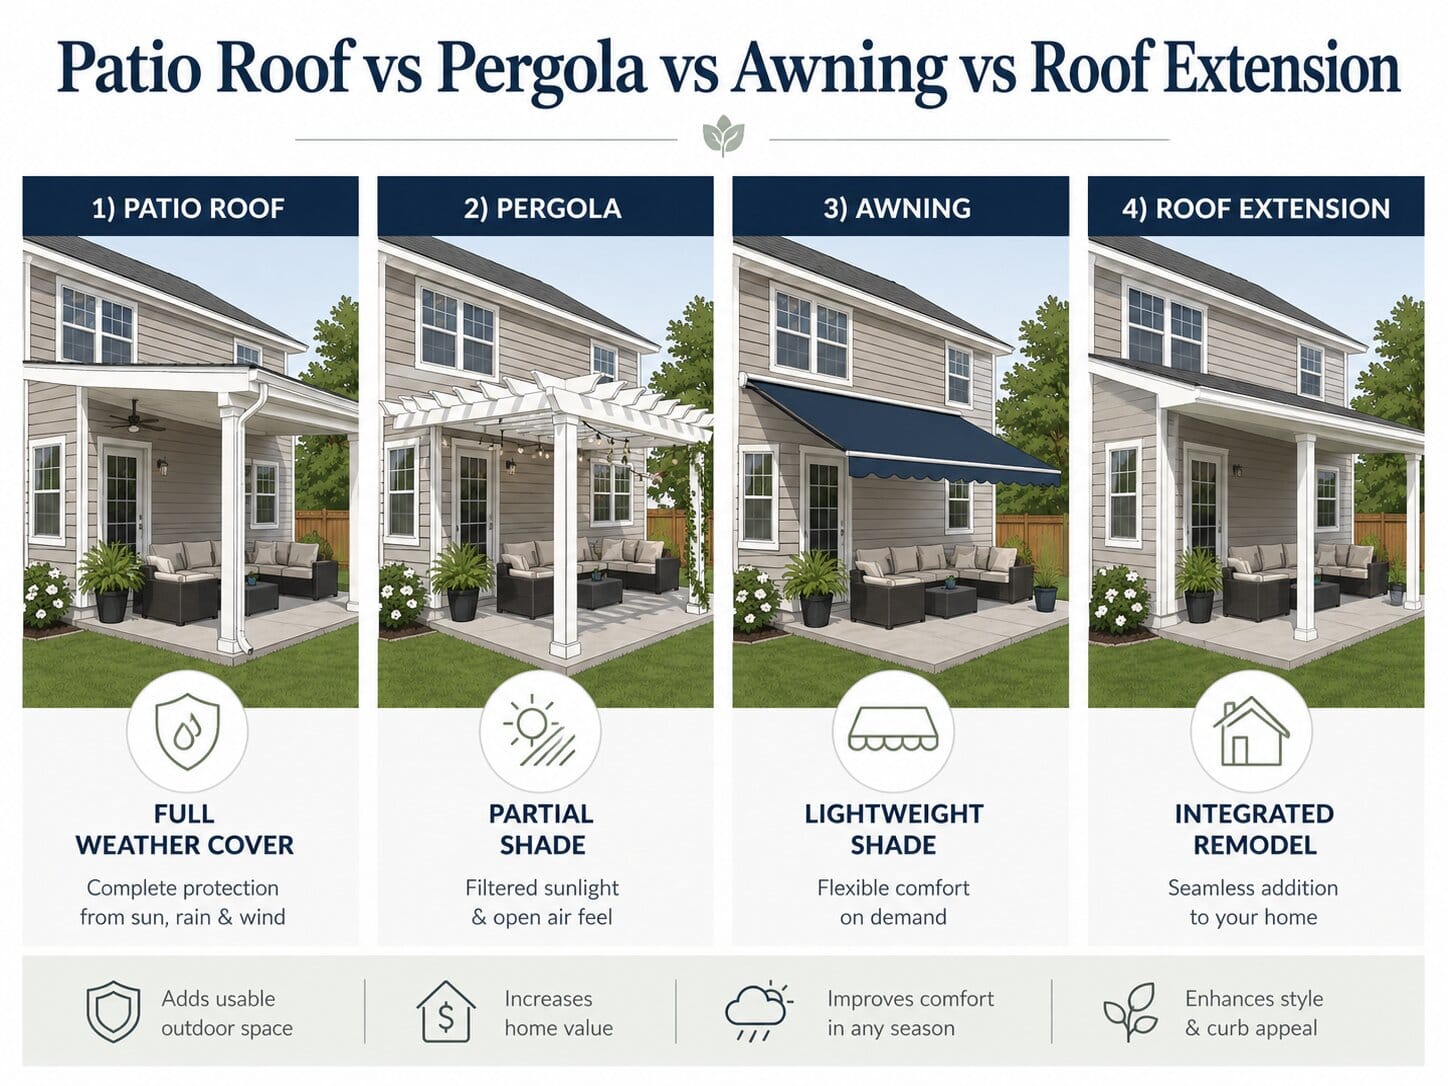
Patio Roof vs. Pergola vs. Awning vs. Roof Extension
Before choosing a design, understand the differences.
| Type | Main Function | Typical Structure | Main Risk |
|---|---|---|---|
| Patio roof | Covers an outdoor living area from sun and rain | Posts, beams, rafters, roof covering, flashing | Structural load, water management, permits |
| Pergola | Provides partial shade and visual structure | Posts, beams, open rafters or slats | Wind uplift, weak anchoring, limited rain protection |
| Awning | Provides shade or light rain protection | Fabric or metal cover attached to wall | Wind uplift, fastener failure |
| Freestanding patio cover | Covers patio without attaching to house | Independent posts and footings | Footing design, lateral bracing, drainage |
| Roof extension | Extends the existing roofline | Integrated roof framing and structural tie-in | Requires advanced framing, flashing, permits, engineering |
| Glass or polycarbonate roof | Allows light while adding weather cover | Framed panels over beams or rafters | Expansion, leaks, impact resistance, code compliance |
A simple shade idea can become a structural project when it attaches to the house or carries roof loads.
Can You Attach a Patio Roof to an Existing House?
Yes, but only when the connection is designed correctly. The existing house must be able to support the attachment, and the patio roof must have its own safe load path to the ground.
A safe attached patio roof must address:
- Building permit requirements
- Local design loads
- Existing wall or roof framing
- Footing size and depth
- Post and beam sizing
- Rafter sizing and spacing
- Roof pitch
- Roof covering weight
- Wind uplift resistance
- Snow load, if applicable
- Seismic requirements, if applicable
- Corrosion-resistant connectors
- Flashing and waterproofing
- Gutter and drainage changes
- Inspection requirements
The key point is this: a patio roof is not safe simply because it is screwed to the house. It must be structurally supported and properly flashed.
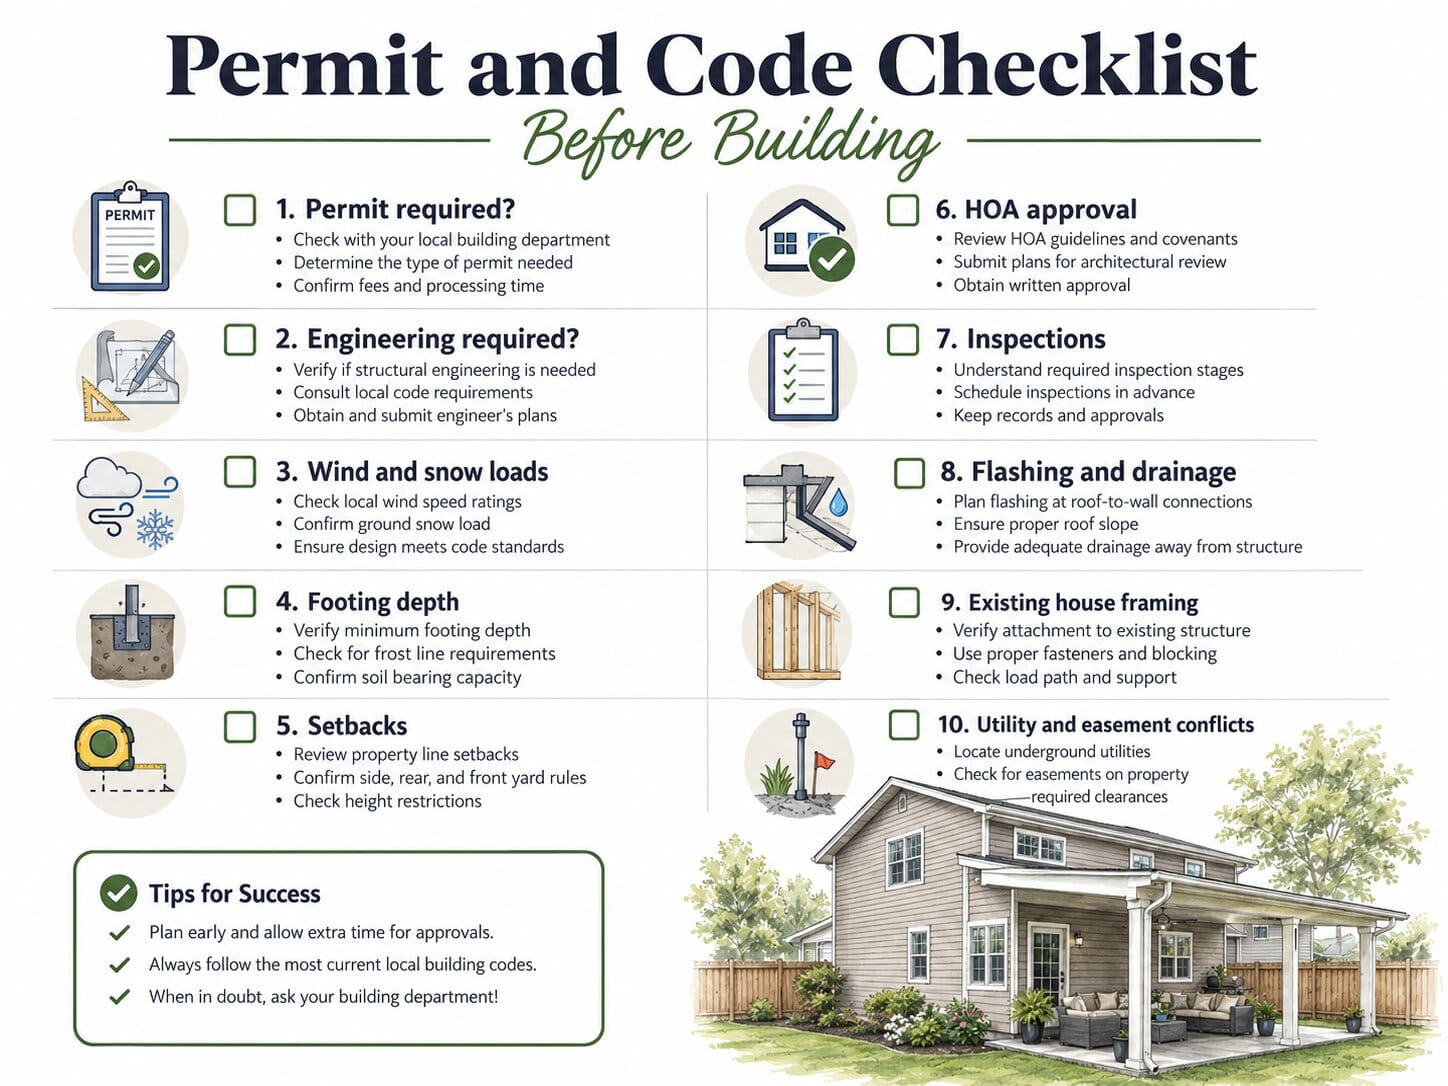
Do You Need a Permit for an Attached Patio Roof?
In many U.S. jurisdictions, yes. An attached patio roof often requires a building permit because it adds a structural element to the house. Some cities may also require zoning approval, HOA approval, or engineering documents.
Permit rules can vary based on:
- Size of the patio cover
- Whether it is attached or freestanding
- Roof material
- Height
- Location on the lot
- Setbacks
- Wind speed zone
- Snow load
- Seismic category
- Coastal exposure
- Fire zone
- Historic district rules
- HOA restrictions
Before starting, contact your local building department and ask:
- Does an attached patio roof require a permit?
- Are engineered drawings required?
- What design loads apply to my address?
- What footing depth is required?
- What setbacks apply?
- Are inspections required?
- Are there special wind, snow, wildfire, or seismic rules?
- Can the roof attach to the existing wall or roof framing?
- Are manufactured patio cover kits accepted?
- What documents must be submitted?
Do not rely only on general online advice. The local authority having jurisdiction decides what is required.
Why Load Path Matters

A patio roof must transfer loads safely from the roof covering down to the ground.
A basic load path looks like this:
Roof covering → rafters → beam or ledger → posts or house framing → footings or foundation → ground
Wind uplift reverses some of these forces. Instead of pushing down, wind can pull the roof upward. This is why nails, screws, brackets, straps, post bases, beam connectors, and ledger fasteners matter.
A weak connection can cause:
- Roof uplift
- Post separation
- Beam rotation
- Ledger failure
- Water intrusion
- Siding damage
- Fascia failure
- Structural collapse
- Damage to the existing house
A safe patio roof needs a continuous load path, not random fasteners.
Key Components of an Attached Patio Roof
1. Footings
Footings support the posts and transfer loads to the soil. They must be sized for local soil conditions, frost depth, roof load, wind uplift, and structural design.
Footings may need to extend below the frost line in cold climates. In high-wind regions, footings and post bases must also resist uplift.
Do not simply place posts on pavers, soil, or a thin patio slab unless the design specifically allows it.
2. Posts
Posts support beams and transfer roof loads down to the footings. They must be sized correctly and anchored with appropriate post bases or connectors.
Wood posts should not sit directly in standing water. Use proper post bases, corrosion-resistant hardware, and pressure-treated or exterior-rated materials where required.
3. Beams
Beams carry the rafters and transfer loads to posts. Beam size depends on span, roof load, snow load, species, grade, and design.
A beam should not be attached only with a few nails. Beam-to-post connections need proper bearing and approved connectors.
4. Rafters
Rafters support the roof covering. Rafter size and spacing depend on span, roof material, live load, snow load, and local code.
A lightweight metal roof, asphalt shingles, polycarbonate panels, and tile roof do not weigh the same. The structure must match the material.
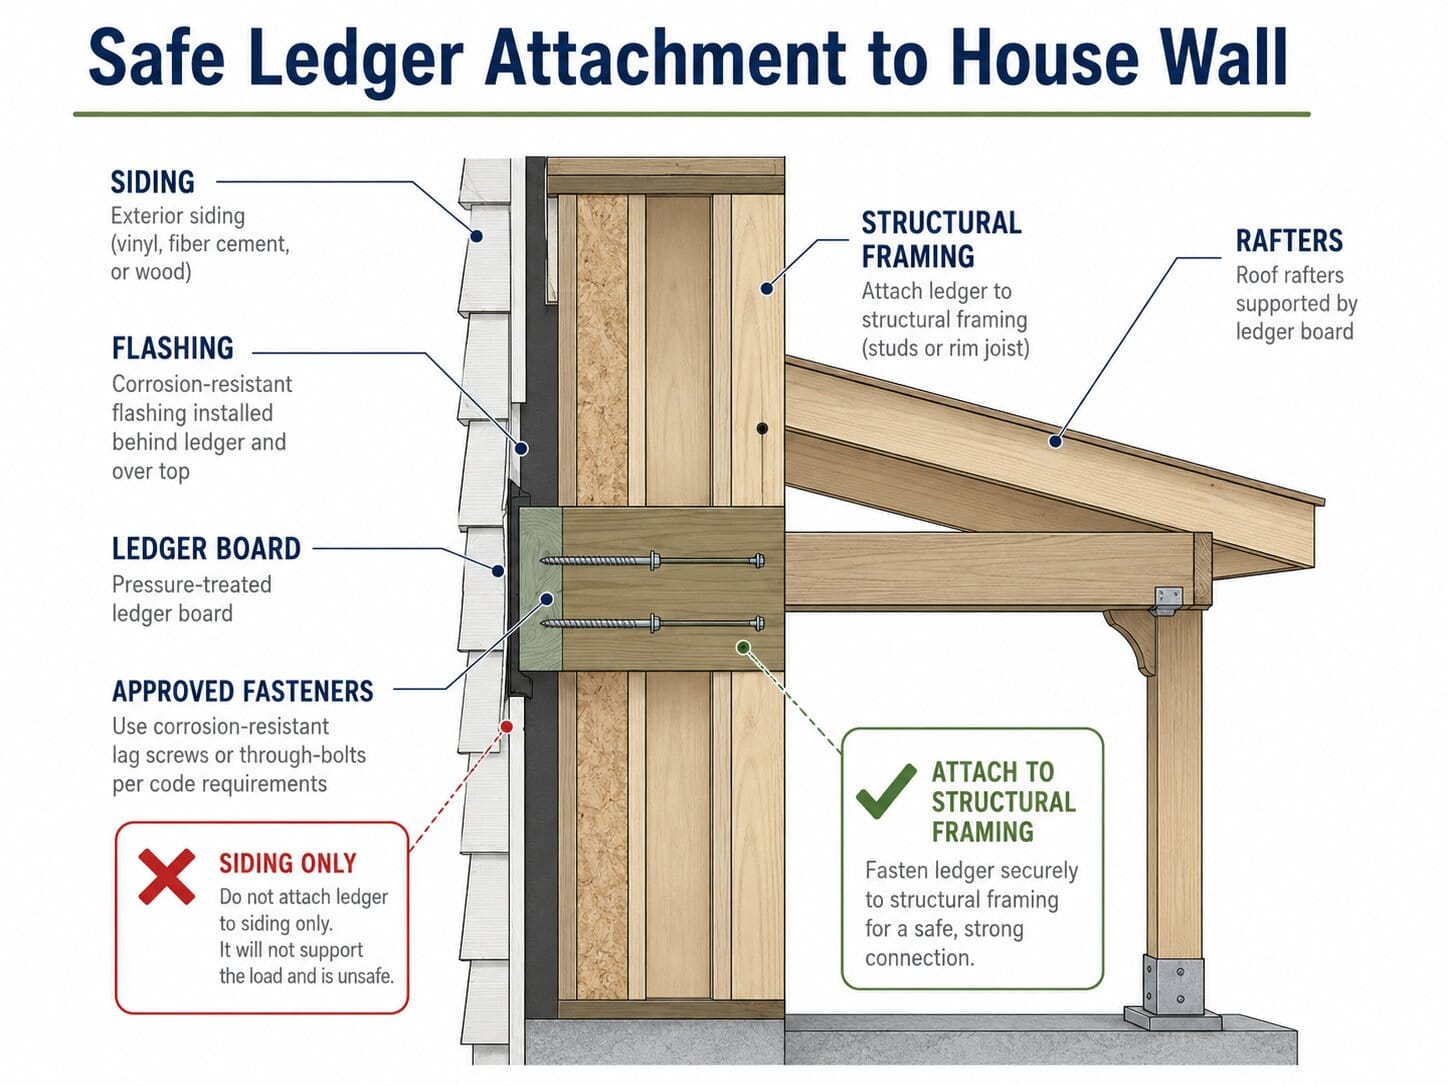
5. Ledger Board
A ledger is a horizontal board attached to the house framing. It may support one side of the patio roof. A ledger must attach to structural framing, not just siding, sheathing, trim, or fascia.
A ledger connection must use proper fasteners, spacing, flashing, and structural verification.
6. Connectors and Fasteners
Patio roofs need connectors designed for structural loads. These may include joist hangers, hurricane ties, post bases, post caps, straps, anchors, bolts, and approved screws.
Use fasteners rated for the material and environment. Coastal areas, treated lumber, and outdoor exposure may require corrosion-resistant hardware.
7. Roof Covering
Roof covering affects weight, pitch, drainage, appearance, and durability.
Common options include:
- Asphalt shingles
- Metal roofing
- Polycarbonate panels
- Fiberglass panels
- Standing seam metal
- Wood framing with roof sheathing
- Manufactured aluminum patio cover panels
- Glass panels, when properly engineered
Each material has manufacturer requirements for slope, fastening, support spacing, and flashing.
8. Flashing
Flashing keeps water out of the house. It is one of the most important parts of an attached patio roof.
Common flashing elements may include:
- Wall flashing
- Counterflashing
- Step flashing
- Kickout flashing
- Drip edge
- Ledger flashing
- Housewrap integration
- Siding integration
- Roof underlayment integration
Caulk alone is not flashing. Sealant can help, but it should not be the primary water-management strategy.
9. Gutters and Drainage
A patio roof changes how rainwater moves. It may affect existing gutters, downspouts, roof valleys, wall drainage, and foundation drainage.
Plan where water will go before building. Poor drainage can damage siding, fascia, foundations, basements, crawl spaces, landscaping, and patios.
Main Ways to Attach a Patio Roof to an Existing House
1. Wall-Attached Patio Roof With Ledger
This is one of the most common methods. A ledger is attached to the house’s structural framing, and rafters connect from the ledger to a beam supported by posts.
Best for:
- Homes with accessible structural wall framing
- Simple shed-style patio roofs
- Patios directly beside the house
- Designs with proper flashing access
Key requirements:
- Ledger attached to structural framing
- Proper fastener schedule
- Flashing behind and above the ledger
- Corrosion-resistant hardware
- Beam and post support
- Footings sized for local loads
- Correct roof pitch and drainage
Main risk:
If the ledger is not attached and flashed correctly, it can leak, rot, or pull away from the house.
2. Roof Tie-In or Roof Extension
This method integrates the patio roof with the existing roof. It may involve cutting into the roof, tying into rafters or trusses, matching pitch, installing new valleys, and adding new roofing.
Best for:
- Major remodels
- Permanent roof extensions
- Homes where roofline integration matters
- Projects handled by professionals
Key requirements:
- Structural review
- Roof framing plan
- Permit drawings
- Proper flashing
- Roofing integration
- Valley and drainage planning
- Inspection
Main risk:
This is not a beginner DIY method. Poor roof tie-ins can cause leaks, framing damage, and structural problems.
3. Freestanding Patio Cover Next to the House
A freestanding patio cover stands on its own posts and footings. It may be placed near the house without relying on the house for structural support.
Best for:
- Homes where attachment is difficult
- Brick veneer or complex siding
- Weak fascia or uncertain framing
- Buyers who want less risk to the existing house
- Areas where a separate structure is easier to permit
Key requirements:
- Independent footings
- Posts and beams
- Lateral bracing
- Uplift resistance
- Proper drainage away from the house
Main risk:
Even freestanding covers must be engineered or built to code. They still need wind and footing design.
4. Manufactured Patio Cover Kit
Manufactured patio cover systems are often made from aluminum, insulated panels, or engineered components. They may have tested spans and approved installation details.
Best for:
- Homeowners who want a standardized system
- Projects where manufacturer engineering is available
- Areas where local officials accept product approvals
- Faster installation
Key requirements:
- Follow manufacturer instructions
- Use approved fasteners
- Follow span tables
- Confirm local code acceptance
- Verify wind and snow rating
- Install flashing correctly
Main risk:
A kit is only safe when installed exactly as specified and approved for the site conditions.
5. Awning or Lightweight Shade Attachment
Awnings can provide shade and some weather protection. They are usually lighter than framed patio roofs but still require proper anchoring.
Best for:
- Shade-focused projects
- Smaller patios
- Areas with moderate weather exposure
- Homeowners who do not need a full roof
Key requirements:
- Manufacturer-approved anchors
- Structural backing
- Wind rating
- Proper wall surface preparation
- Retraction or storm-use guidance
Main risk:
Wind uplift can damage awnings if anchors or backing are weak.
6. Pergola Attached to the House
A pergola provides partial shade with open rafters or slats. Some homeowners add shade cloth, vines, or polycarbonate panels.
Best for:
- Decorative shade
- Outdoor living areas
- Dry climates
- Partial sun control
Key requirements:
- Proper ledger or beam attachment
- Post footings
- Wind-resistant connectors
- Clear understanding that it may not be a waterproof roof
Main risk:
A pergola is often mistaken for a roof. If panels are added later, loads and drainage can change.
Warning: Do Not Attach a Patio Roof to Fascia Alone

Fascia boards are often trim or edge boards. They are not always designed to carry roof loads, wind uplift, or snow loads from a patio cover.
Do not attach a patio roof to fascia alone unless a manufactured system or engineered design specifically allows it.
A safe design usually needs connection to structural framing, posts, beams, footings, and approved connectors.
Patio Roof Planning Checklist
Before building, complete this checklist.
Permit and Code
- Check whether a permit is required.
- Ask if engineered drawings are needed.
- Confirm local wind speed requirements.
- Confirm local snow load requirements.
- Confirm seismic requirements if applicable.
- Check wildfire, coastal, or flood-zone requirements.
- Ask about inspections.
Existing House
- Identify the wall or roof framing.
- Check whether attachment is possible.
- Look for rot, water damage, cracks, or weak framing.
- Do not attach to siding, trim, sheathing, or fascia only.
- Check windows, doors, vents, meters, and egress openings.
- Confirm there is room for flashing.
Foundation and Support
- Determine footing size and depth.
- Confirm frost depth if applicable.
- Plan post locations.
- Use proper post bases.
- Confirm slab strength if posts are proposed on an existing slab.
- Do not assume a patio slab can support roof posts.
Roof and Drainage
- Choose roof pitch.
- Choose roof material.
- Confirm manufacturer slope requirements.
- Plan gutters and downspouts.
- Avoid directing water toward the house foundation.
- Plan for snow shedding if applicable.
- Integrate flashing with wall or roof layers.
Structural Connections
- Use approved connectors.
- Use proper fasteners.
- Check corrosion resistance.
- Provide roof-to-beam connection.
- Provide beam-to-post connection.
- Provide post-to-footing connection.
- Provide lateral bracing where needed.
- Provide uplift resistance.
HOA and Property Rules
- Check HOA approval.
- Check setbacks.
- Check lot coverage limits.
- Check easements.
- Check utility access.
- Check architectural rules.
Safe Construction Overview
The following overview explains the general process. It is not a complete construction plan.
Step 1: Define the Patio Roof Type
Decide whether you want a full roof, pergola, awning, freestanding cover, or roof extension. Each type has different structural and permit requirements.
Step 2: Check Local Code and Permits
Contact the local building department before buying materials. Ask about permit submittals, drawings, inspections, loads, and setbacks.
Step 3: Evaluate the Existing House
A contractor or engineer may need to inspect the wall, roof framing, fascia, siding, sheathing, foundation, and drainage conditions. This step determines whether attachment is practical.
Step 4: Choose the Attachment Method
Choose between a wall ledger, roof tie-in, freestanding cover, manufactured kit, awning, or pergola. The safest option depends on the house and site.
Step 5: Design the Load Path
Plan how loads move from the roof covering into rafters, beams, posts, footings, and the ground. Also plan how wind uplift is resisted.
Step 6: Plan Footings and Posts
Footings must support the structure and resist movement. Posts must be anchored with proper bases and connectors.
Step 7: Plan Rafters, Beams, and Connectors
Rafter size, beam size, span, and connector type must match the roof load and local code. Do not guess.
Step 8: Plan Flashing and Water Management
Design flashing before installing the roof. Water must drain away from the wall and foundation.
Step 9: Install According to Approved Plans
Follow permit drawings, manufacturer instructions, and inspection requirements. Use specified fasteners and connectors.
Step 10: Inspect Before Closing the Project
Complete required inspections. Check for proper flashing, drainage, connectors, roof slope, post anchoring, and visible defects.
Patio Roof Design Ideas
1. Shed-Style Patio Roof
A shed-style patio roof slopes away from the house. It is simple, practical, and often works well for attached patio covers.
Best for:
- Modern homes
- Simple backyard patios
- Rainwater control
- Lower-cost projects
Watch out for:
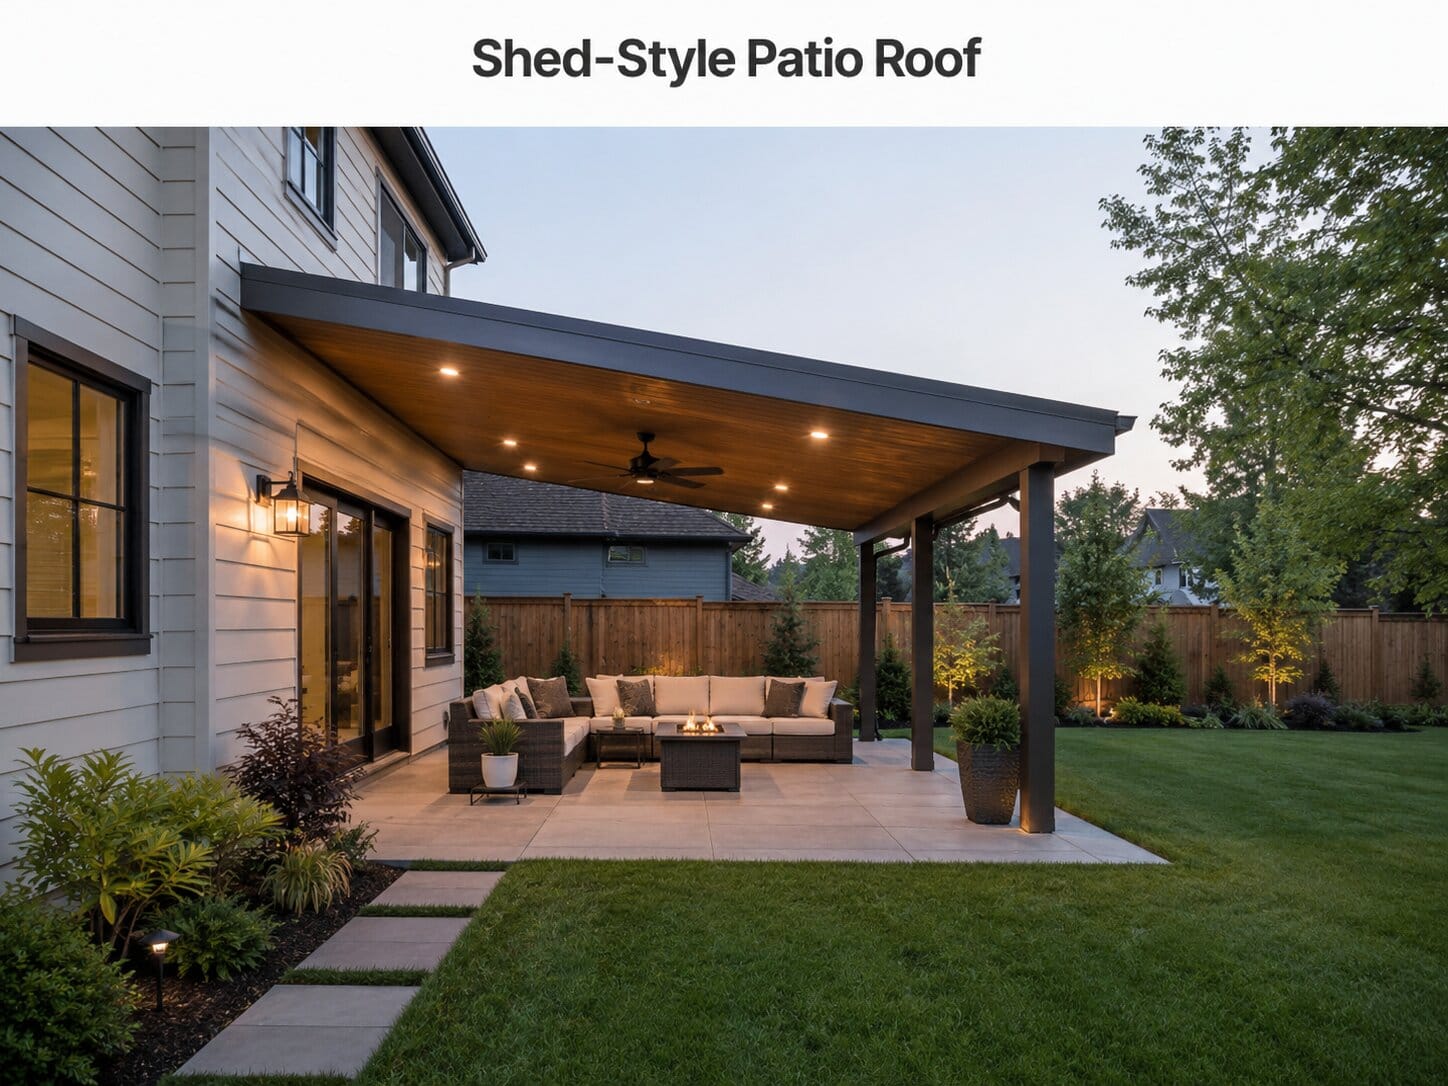 The roof must have enough slope for the selected material and must be flashed correctly at the house wall.
2. Gable Patio Roof
A gable patio roof has two sloped sides and a triangular end. It can look like a natural extension of the house.
Best for:
- Traditional homes
- Larger patios
- Higher ceiling feel
- Better visual integration
Watch out for:
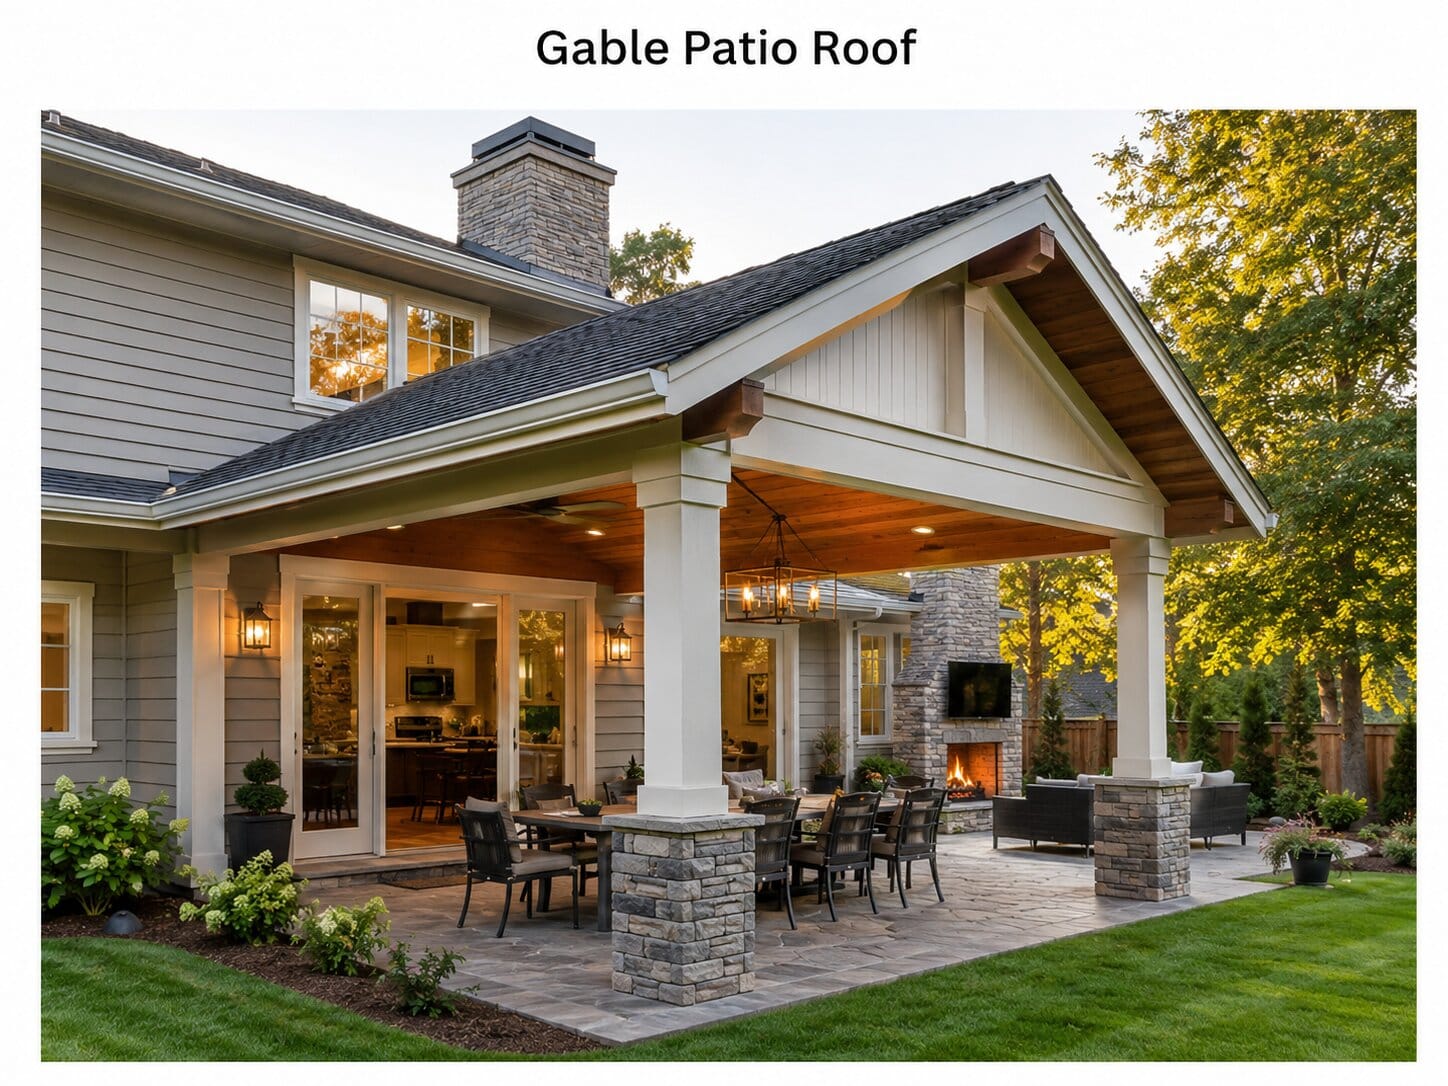 Gable roofs are more complex. They often require stronger framing and careful tie-in.
3. Hip Patio Roof
A hip roof slopes on multiple sides. It can look polished and handle wind better in some designs when properly engineered.
Best for:
- Detached or semi-detached patio covers
- Homes with existing hip roofs
- Finished outdoor rooms
Watch out for:
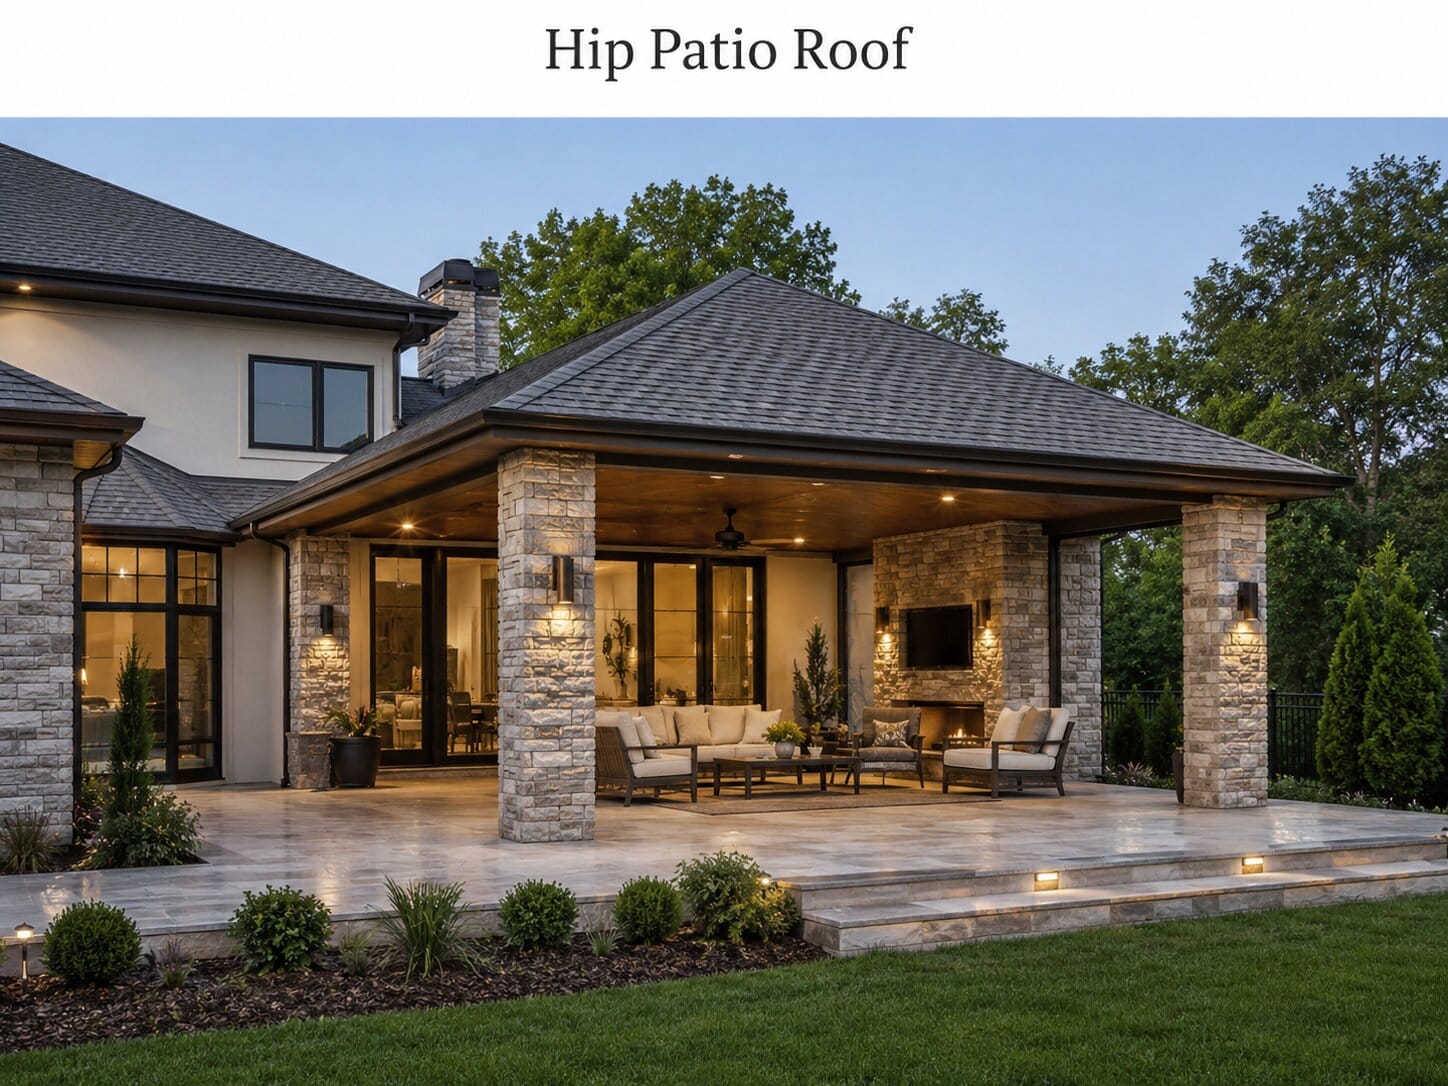 Hip roof framing is more complex than a simple shed roof.
4. Metal Patio Roof
Metal roofing is durable and can be lightweight compared with some roof materials. It works well for many patio covers.
Best for:
- Rain protection
- Modern or farmhouse style
- Long-term durability
- Lower slope designs, when approved by manufacturer
Watch out for:
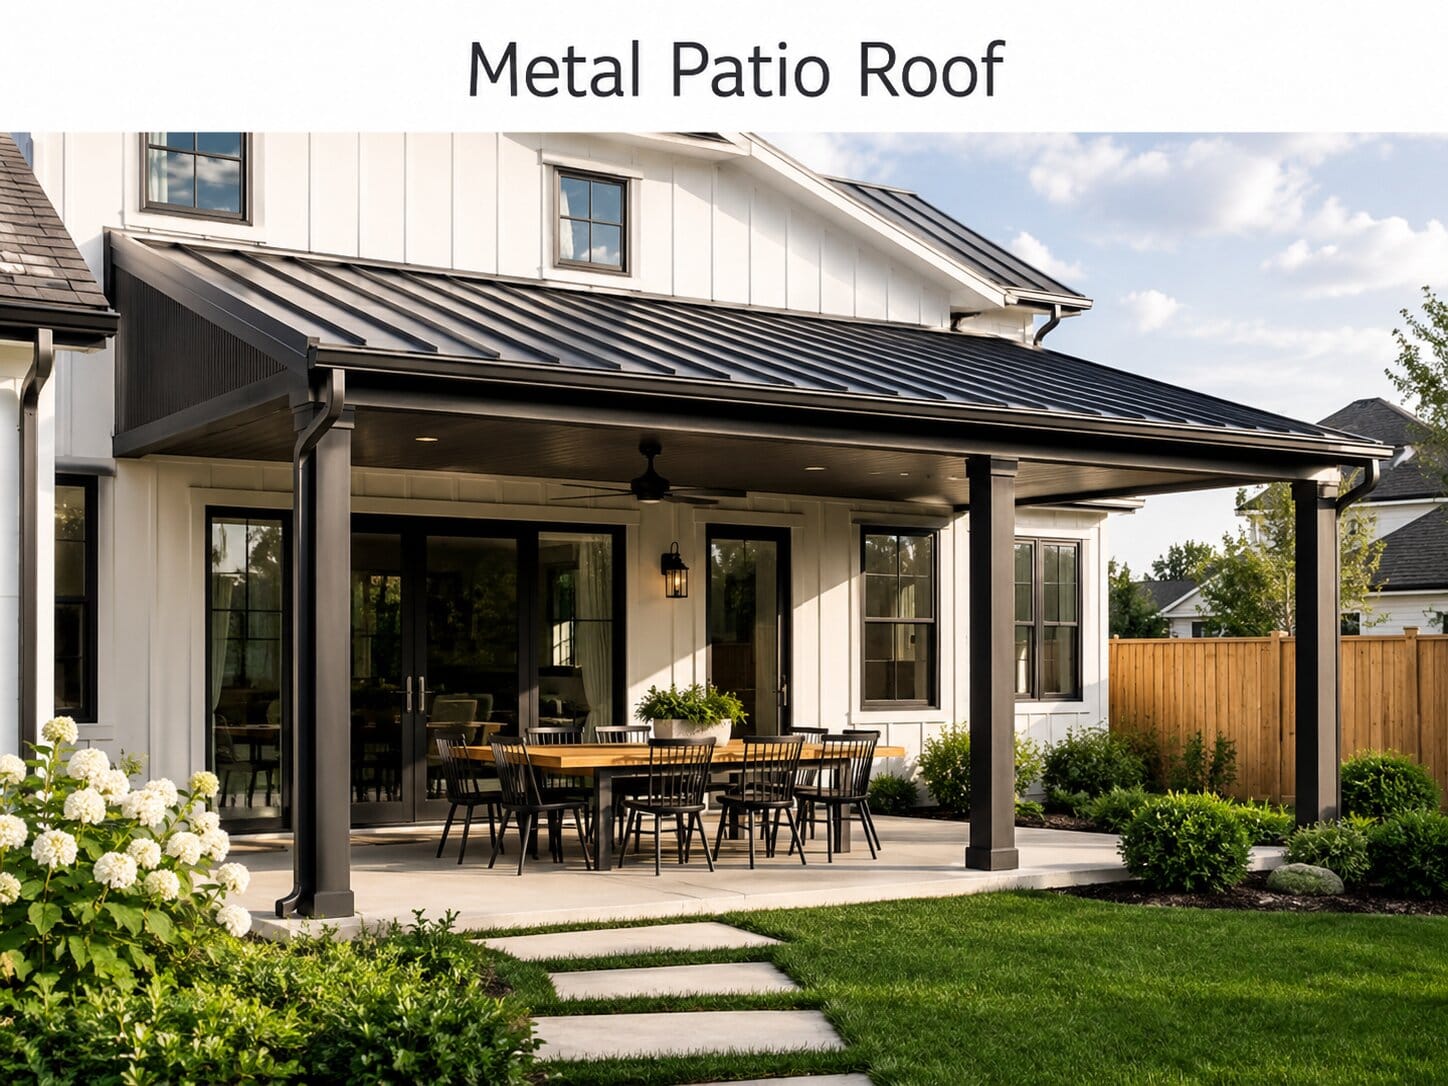 Metal roofs need proper fastening, underlayment, condensation planning, and noise consideration.
5. Polycarbonate Patio Roof
Polycarbonate panels allow light while blocking some weather. They can make a patio feel bright.
Best for:
- Garden patios
- Light-filled outdoor areas
- Small patios
- Areas where shade and daylight are both desired
Watch out for:
 Panels need correct support spacing, expansion gaps, slope, and manufacturer-approved fasteners.
6. Insulated Patio Cover
Insulated roof panels can reduce heat transfer and create a more comfortable outdoor space.
Best for:
- Hot climates
- Large patios
- Outdoor kitchens
- Long-term outdoor living spaces
Watch out for:
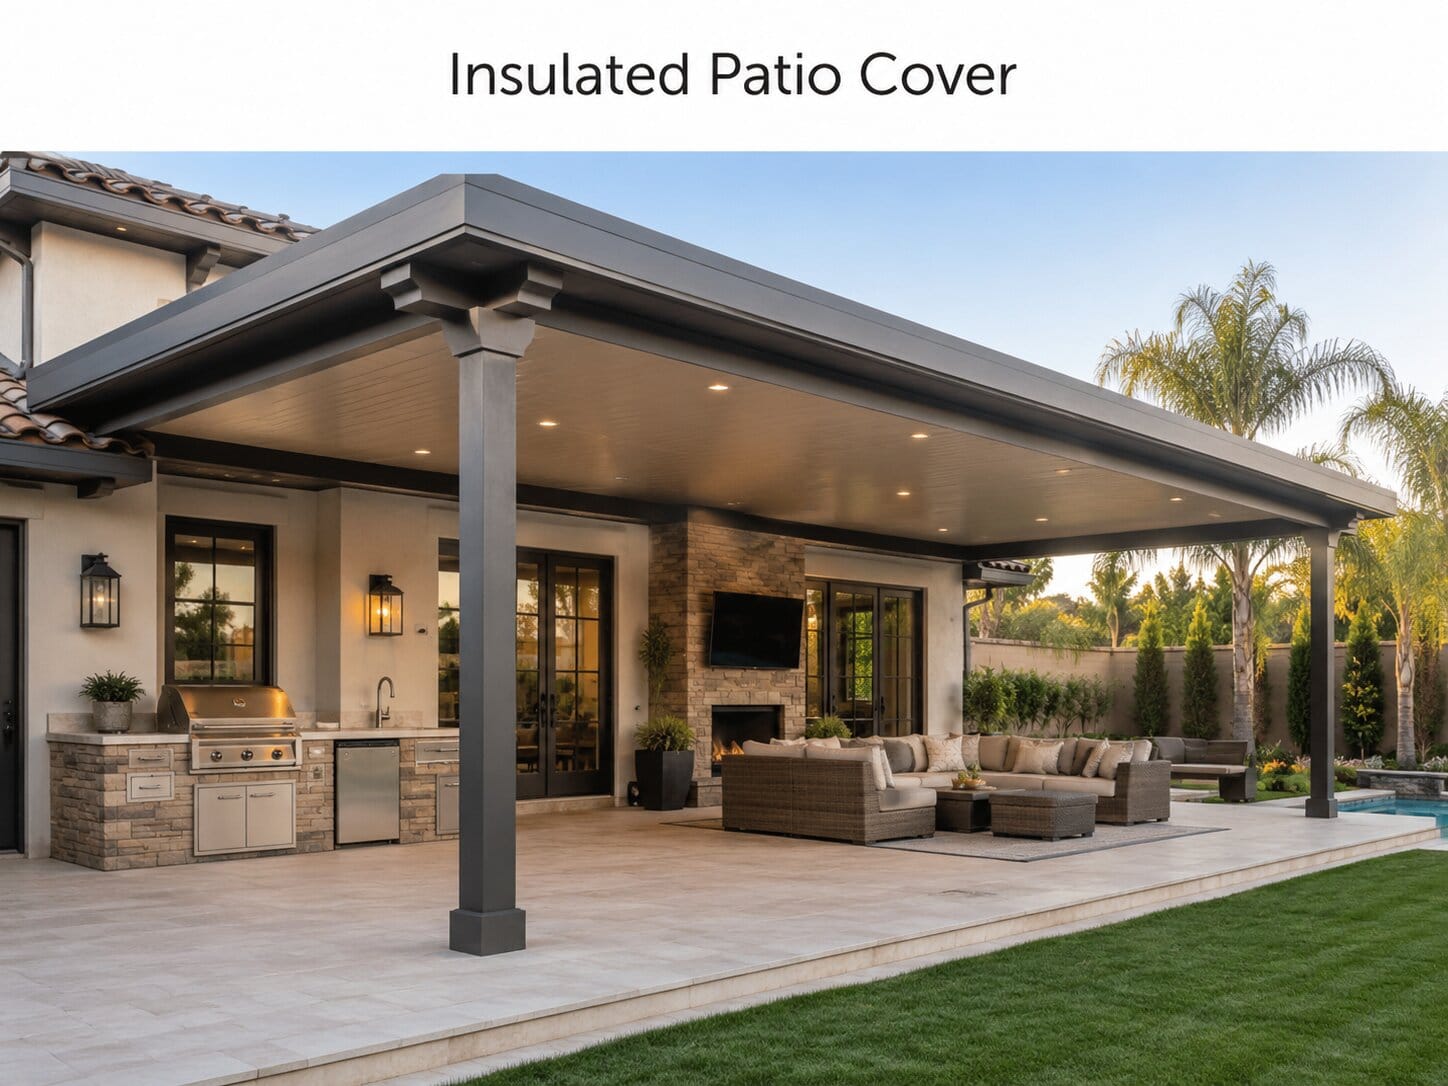 Use manufacturer-approved spans, connections, and flashing details.
7. Pergola With Partial Cover
A pergola can add shade and visual interest. It may be left open or combined with shade cloth.
Best for:
- Dry climates
- Decorative shade
- Garden patios
- Lower-coverage outdoor spaces
Watch out for:
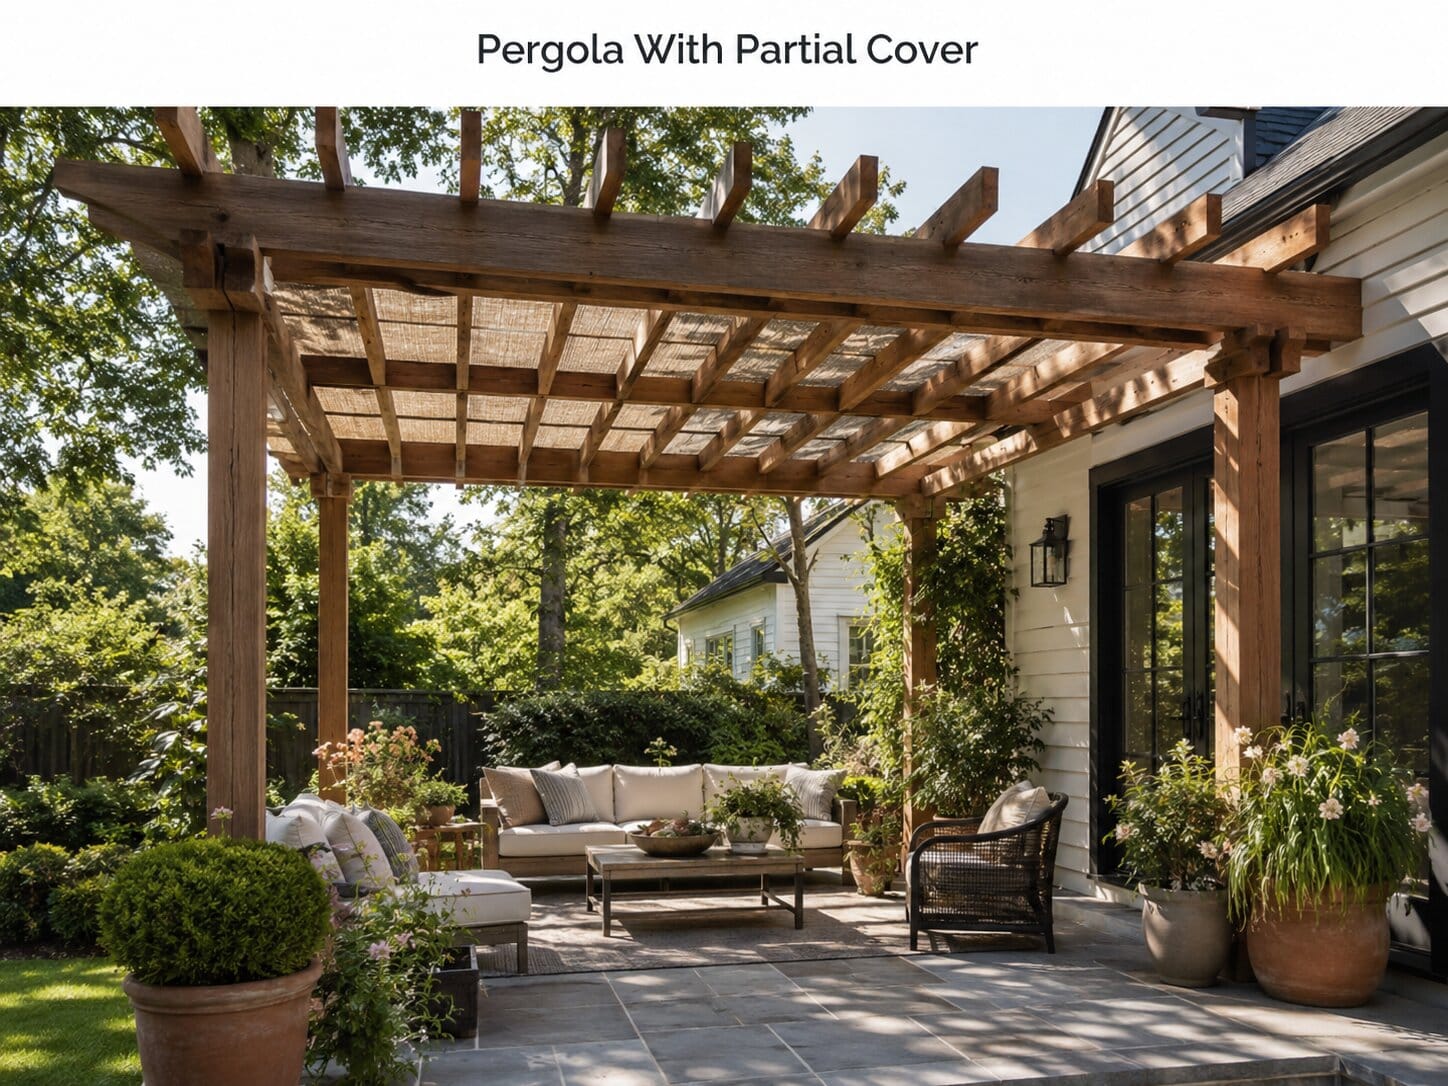 Adding solid panels later changes loads and drainage. Plan this before building.
8. Awning-Style Patio Cover
An awning can be fixed or retractable. It provides shade without building a full roof structure.
Best for:
- Small patios
- Shade-focused projects
- Homes where full attachment is not practical
- Budget-conscious homeowners
Watch out for:
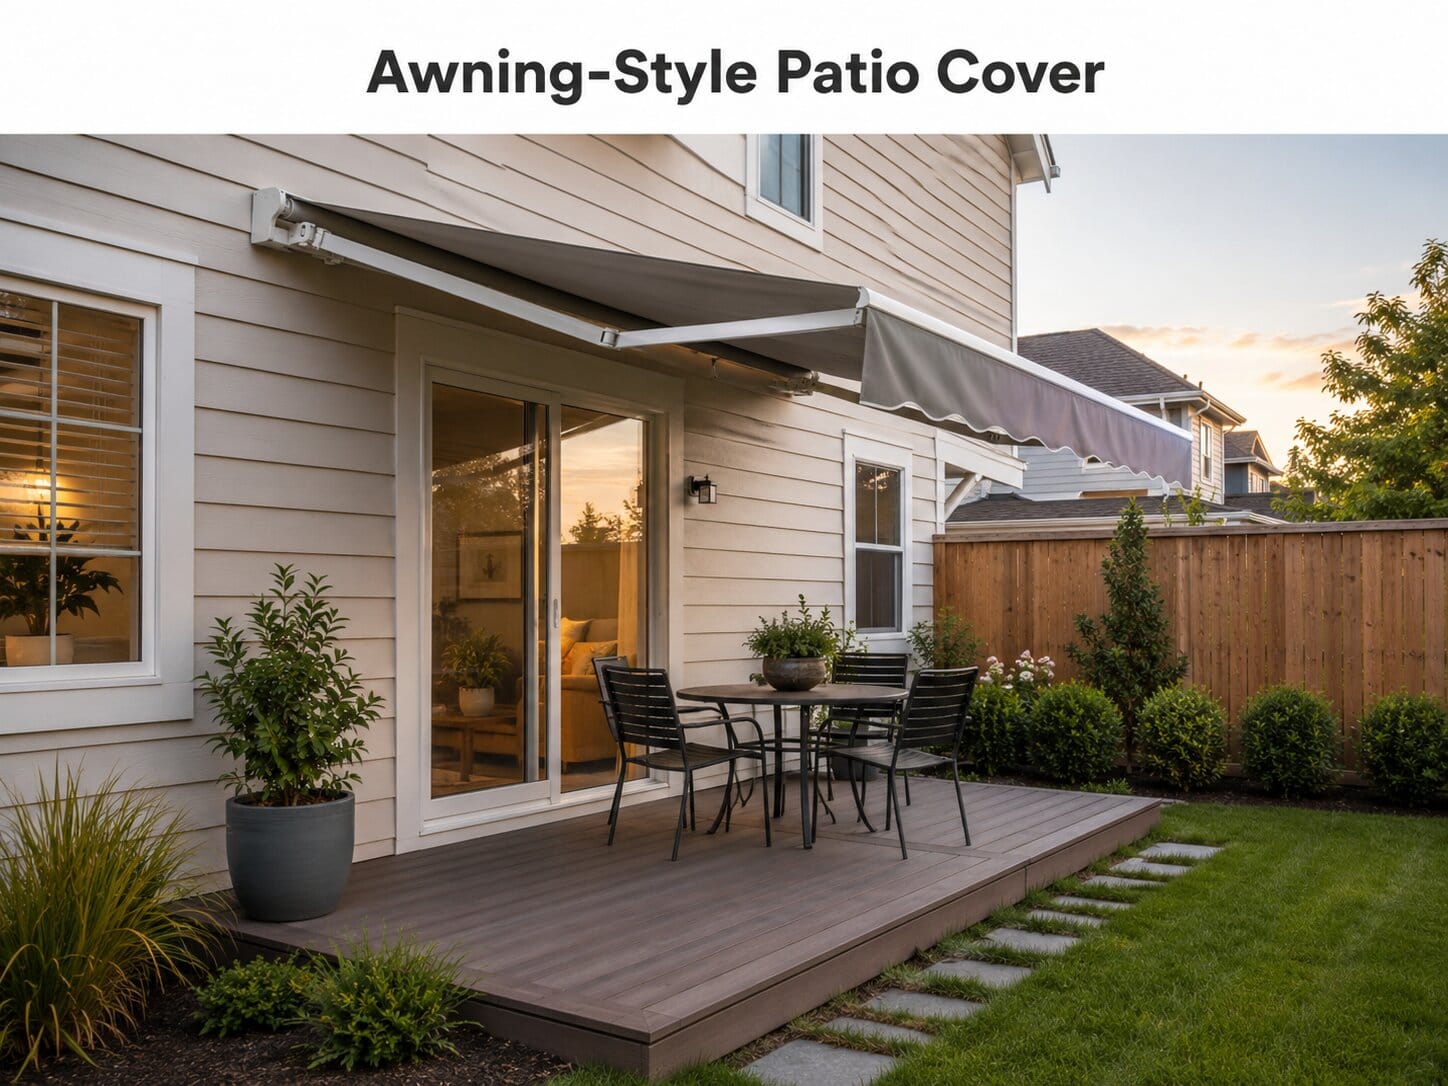 Wind rating and anchor strength are critical.
9. Glass Patio Roof
Glass creates a bright, upscale look. It must use proper safety glass and engineered framing.
Best for:
- Modern homes
- Courtyard patios
- Areas where daylight is important
- High-end designs
Watch out for:
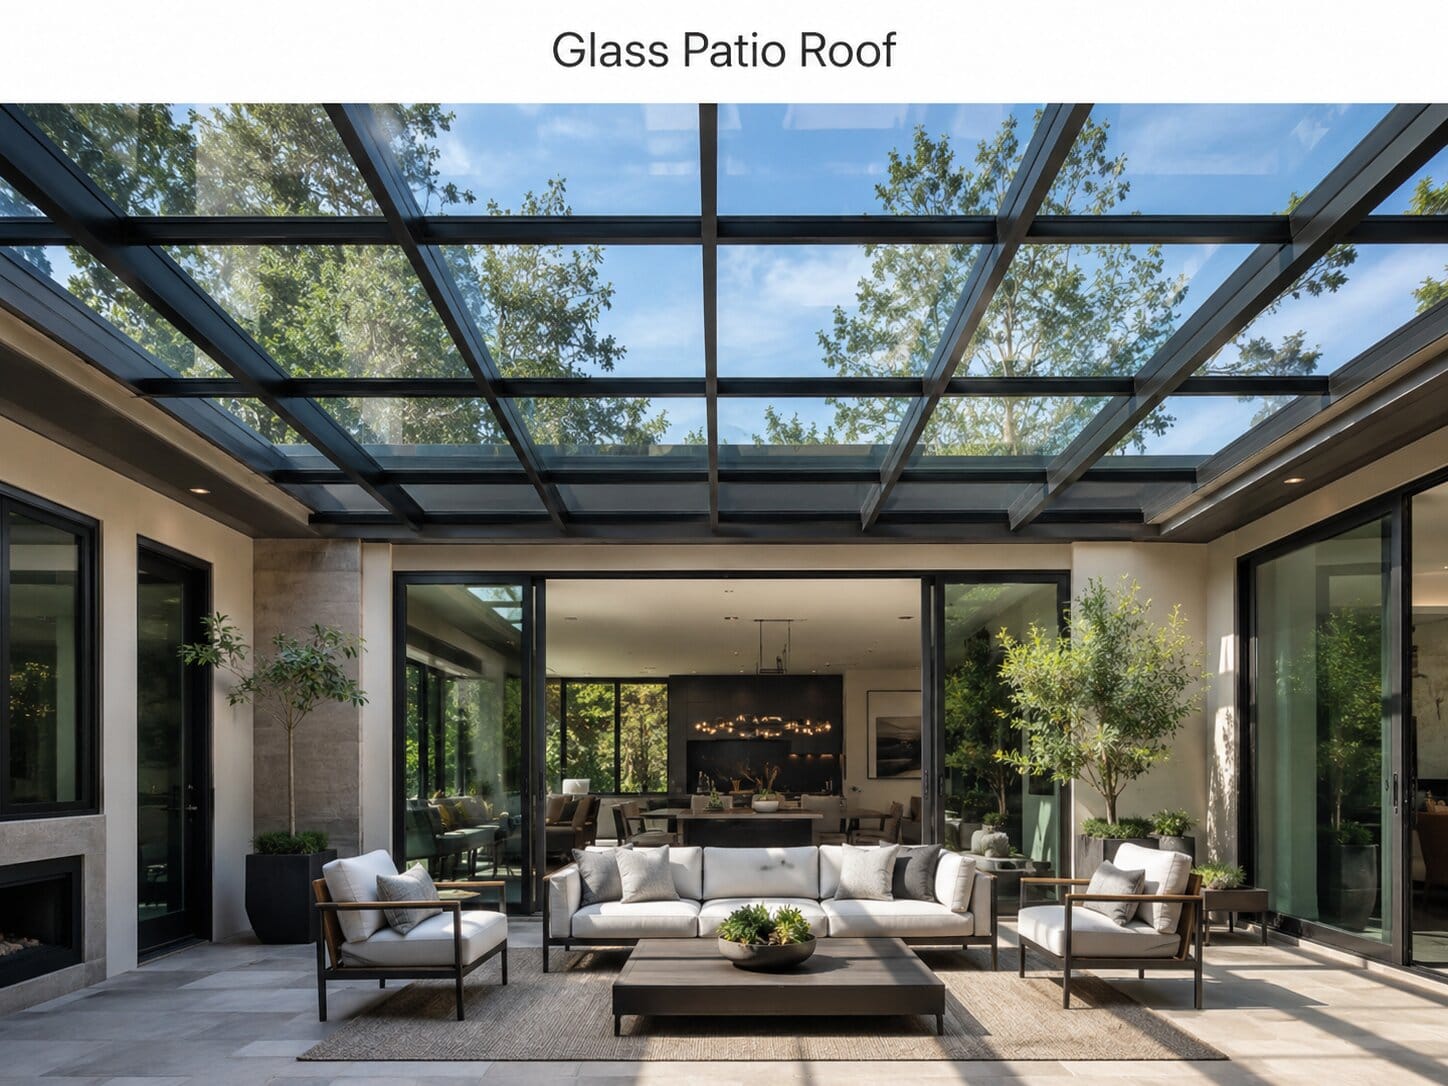 Glass roofs need professional design, safe glazing, thermal movement planning, and careful drainage.
10. Freestanding Patio Pavilion
A freestanding pavilion can sit near the house without structurally attaching to it.
Best for:
- Large backyards
- Outdoor kitchens
- Poolside patios
- Homes where attachment is difficult
Watch out for:
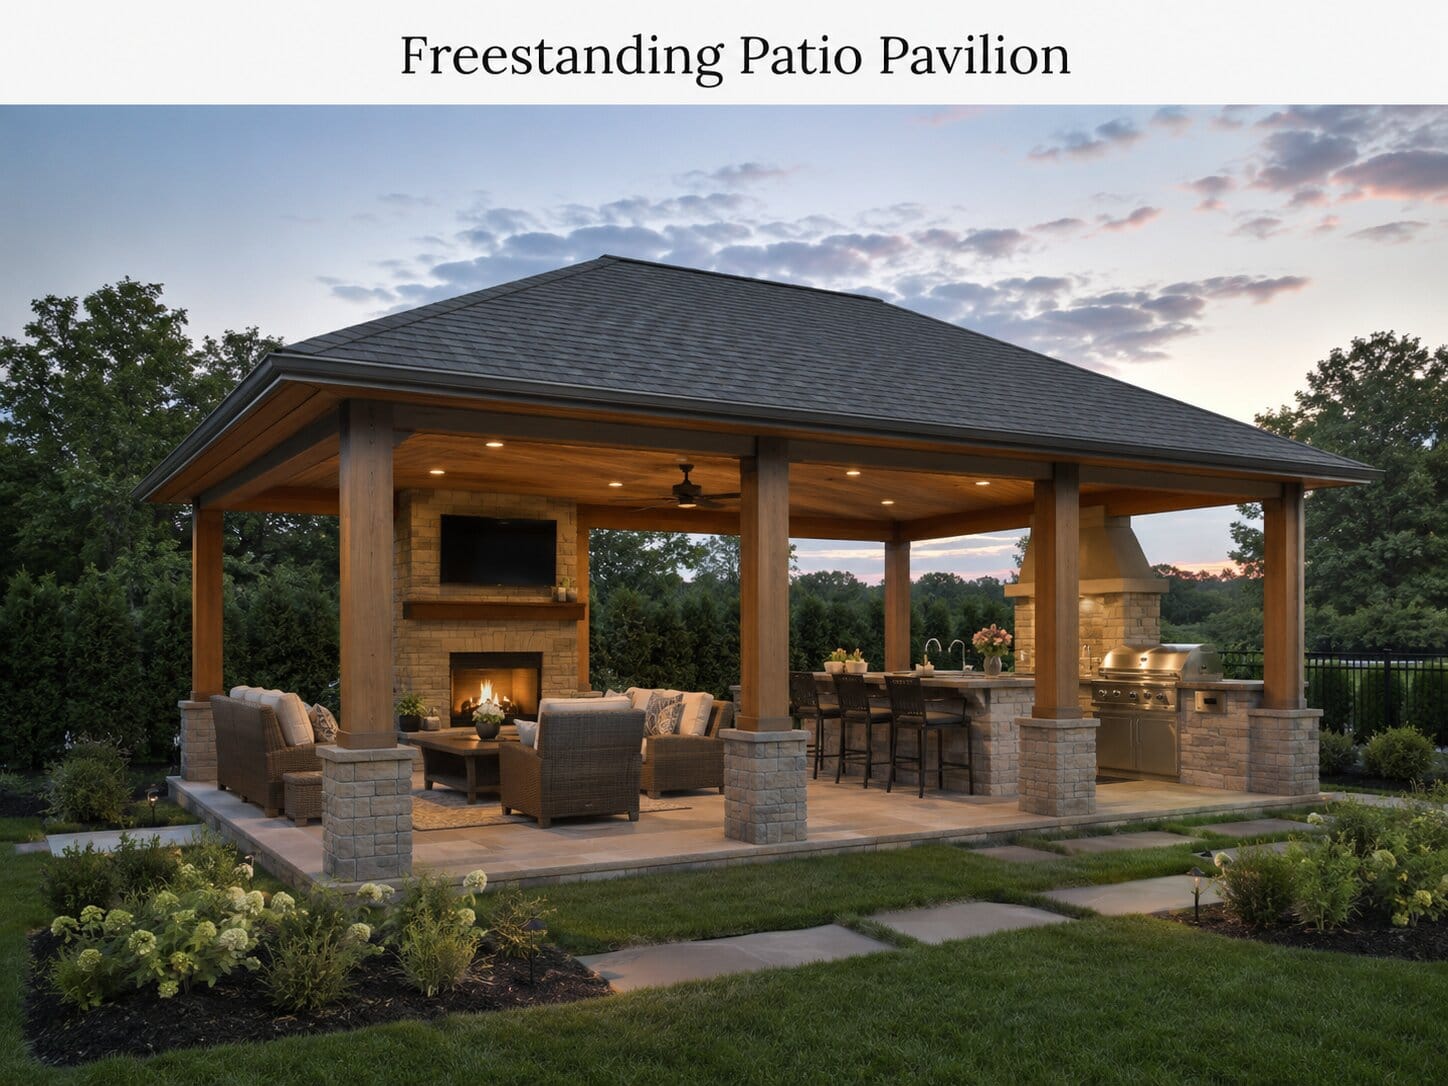 It still needs footings, bracing, wind resistance, and local permit approval.
Also read: Floor to Ceiling Windows Cost and Ideas
Best Attachment Option by Situation
| Situation | Better Option | Why |
| House has clear structural wall framing | Ledger-attached shed roof | Direct, common, and practical when flashed properly |
| Existing fascia is weak or uncertain | Freestanding cover | Avoids relying on nonstructural fascia |
| Roofline must look seamless | Roof tie-in | Best visual integration but requires professional design |
| Home is in high-wind area | Engineered attached or freestanding system | Uplift resistance is critical |
| Home is in snow-load region | Engineered roof structure | Snow load can control the design |
| Home has brick veneer | Freestanding or engineered connection | Brick veneer usually should not carry roof loads |
| Homeowner wants shade only | Awning or pergola | May avoid full roof complexity |
| HOA has strict design rules | Permit-ready design package | Easier approval and review |
| Homeowner wants a fast standardized option | Manufactured patio cover kit | Can provide product-specific engineering |
Common Mistakes to Avoid
Mistake 1: Attaching to Fascia Only
Fascia is not always structural. A fascia-only connection can fail if it is not engineered for the load.
Mistake 2: Skipping the Permit
Unpermitted work can lead to fines, failed inspections, insurance issues, and resale problems.
Mistake 3: Ignoring Wind Uplift
Wind can lift a roof. A patio roof needs connectors that resist uplift, not only gravity.
Mistake 4: Assuming the Patio Slab Can Hold Posts
Many patio slabs are not designed as structural footings. Posts may need separate footings.
Mistake 5: Using Caulk Instead of Flashing
Caulk is not a complete water-management system. Proper flashing is essential.
Mistake 6: Blocking Existing Drainage
A new patio roof can overload gutters or direct water toward the foundation.
Mistake 7: Using the Wrong Fasteners
Indoor screws, nonrated hardware, or incompatible fasteners can corrode or fail outdoors.
Mistake 8: Not Checking Snow Load
In snow regions, patio roofs must support local snow load and drifting conditions.
Mistake 9: Cutting Roof Framing Without Engineering
Cutting rafters, trusses, eaves, or roof framing can weaken the house.
Mistake 10: Treating a Pergola Like a Roof
An open pergola and a roofed patio cover have different load and drainage requirements.
When to Hire a Contractor or Structural Engineer
Hire a licensed contractor or structural engineer if:
- The roof attaches to the house.
- You need a permit.
- The patio roof is large.
- The design includes a roof tie-in.
- The home is in a high-wind area.
- The home is in a snow-load region.
- The home is in a seismic region.
- The home is in a coastal or flood-prone area.
- The attachment involves brick veneer.
- The existing framing is hidden or uncertain.
- You need to cut eaves, rafters, trusses, or roofing.
- The project changes gutters or drainage.
- You want to install a heavy roof material.
- You are unsure about footing size or post anchoring.
A professional design may cost more upfront, but it can prevent leaks, structural failure, permit problems, and expensive repairs.
Maintenance After Installation
A patio roof needs regular maintenance.
Check at least once or twice a year for:
- Loose fasteners
- Rusted connectors
- Cracked sealant
- Damaged flashing
- Clogged gutters
- Water stains
- Roof panel damage
- Sagging beams
- Rot near posts
- Insect damage
- Soil movement near footings
- Loose post bases
- Drainage problems
After major storms, check the roof again. Look for movement, leaks, uplift damage, and loose panels.
FAQ About Attaching a Patio Roof to a House
Can I attach a patio roof directly to fascia?
Do not attach a patio roof to fascia alone unless the system is specifically engineered and approved for that connection. Fascia is often not designed to support roof loads or wind uplift.
Do I need a permit for a patio roof in the U.S.?
Many attached patio roofs require a permit. Rules vary by city and county. Always check with your local building department before starting.
Can I build an attached patio roof myself?
Some homeowners can handle small projects, but attached patio roofs involve structure, flashing, and code compliance. If the project affects framing, drainage, or roofing, hire a qualified professional.
What is the safest way to attach a patio roof?
The safest method depends on the house. Common safe approaches include a properly fastened and flashed ledger, an engineered roof tie-in, a manufactured patio cover system, or a freestanding cover with proper footings.
Is a freestanding patio cover better than an attached one?
A freestanding cover can reduce risk to the existing house because it does not rely on house framing. However, it still needs proper footings, bracing, and wind resistance.
What roof pitch does a patio roof need?
The required pitch depends on the roof material and manufacturer instructions. Some materials can work on low slopes, while others need steeper slopes.
Can I use my existing patio slab as the foundation?
Not automatically. Many patio slabs are not designed to support roof posts. A contractor or engineer may need to verify whether separate footings are required.
What is a ledger board?
A ledger board is a horizontal structural board attached to the house framing. It can support one side of a patio roof or deck structure when installed correctly.
Why is flashing important?
Flashing prevents water from entering the wall or roof assembly where the patio roof meets the house. Poor flashing can cause rot, mold, and structural damage.
What is continuous load path?
Continuous load path means roof, rafters, beams, posts, connectors, footings, and the existing house structure work together to transfer loads safely to the ground.
Can I attach a patio roof to brick veneer?
Brick veneer is usually not intended to support structural roof loads. A freestanding design or engineered attachment may be needed.
What material is best for a patio roof?
There is no single best material. Metal, shingles, polycarbonate, insulated panels, and glass can work when matched to the structure, slope, climate, and code.
Can a patio roof be used as a carport?
A patio cover may not be allowed to function as a carport, garage, storage room, or habitable room under some model code provisions. Check local rules before changing its use.
How do I prevent leaks where the patio roof meets the house?
Use proper flashing, counterflashing, underlayment integration, siding integration, and drainage planning. Do not rely only on caulk.
Who should design an attached patio roof?
A qualified contractor can handle many standard projects. A structural engineer may be needed for large spans, high-wind areas, snow regions, roof tie-ins, unusual framing, or complex connections.
Conclusion
Attaching a patio roof to an existing house can create a more comfortable and useful outdoor living space. It can add shade, improve rain protection, and make a patio feel like a true extension of the home.
However, this is not a simple cosmetic upgrade. An attached patio roof must be planned as a structural and water-management project. The design needs proper permits, load calculations, footings, posts, beams, rafters, connectors, flashing, gutters, and drainage.
The safest approach is to start with local code requirements, choose the right attachment method, design a continuous load path, and protect the house from water intrusion. If the project involves structural attachment, roof tie-ins, heavy materials, high wind, snow load, or uncertain framing, hire a qualified contractor or structural engineer.
A well-built patio roof can last for years. A poorly attached one can leak, fail, or damage the home. Plan carefully before you build.